
Contents
INTRODUCTION – USERS WITH ADMINISTRATIVE PRIVILEGES…………………3
USER SETUP………………………………………………………………………………..6
ROLES………………………………………………………………………………………..8
PROFILES…………………..…………………………………………………………….. .10
GROUPS…………………………………………………………………………………… .13
SHARING ACCESS……………………………………………………………………… ..15
FIELDS ACCESS…………………………………………………………………………..18
AUDIT TRAILS……………………………………………………………………………. 19
USER LOGIN HISTORY………………………………………………………………… .20
LAYOUT EDITOR…………………………………………………………………….….. 21
MENU AND MODULE ORGANIZER………………………………………………… ..23
CUSTOM FIELDS…………………………………………………………………………27
PICKLIST EDITOR…………………………………………………………………………
MANDATORY FIELDS…………………………………………………………………….
EMAIL TEMPLATES………………………………………………………………………
MAIL MERGE TEMPLATES……………………………………………………………..
MASS EMAIL MANAGEMENT…………………………………………………………..
FACEBOOK SUBSCRIBE ME APP………………………………………………………..
SERVICE RELATED HISTORY…………………………………………………………
VOICE SETTINGS…………………………………………………………………………
WEBFORMS…………………………………………………………………………………
COMPANY DETAILS……………………………………………………………………….
OUTGOING SERVER……………………………………………………………………….
SUPPORT EMAIL SETUP …………………………………………………………………
EMAIL ARCHIVING SERVICE SETUP…………………………………………………..
WORKFLOW…………………………………………………………………………………
APPLICATION ALERTS……………………………………………………………………
IMPORTING NEW RECORDS…………………………………………………………......
IMPORTING ACCOUNTS AND CONTACTS……………………………………………
THE IMPORT PROCESS……………………………………………………………………
UPDATING EXISTING RECORDS………………………………………………………..
Introduction — Users with Administrative Privileges
This document is intended for new AMPED Administrator Users. It is a guide to AMPED settings, configurations, and features.
A user with administrative privileges is able to access all of the functionalities related to the setup of AMPED by accessing the Admin menu
![]() from the top menu bar. These functionalities include among others, the creation of new users, assigning user access and action permissions, the ability to customize structure site layout, create email templates, and set up workflow. A user with administrative privileges also has permission to access all existing records within the application.
from the top menu bar. These functionalities include among others, the creation of new users, assigning user access and action permissions, the ability to customize structure site layout, create email templates, and set up workflow. A user with administrative privileges also has permission to access all existing records within the application.

Admin Settings – Visible to Users with Administrative Privileges
Each site is created with one administrator user per site. Credentials for this user are given to each company during the customization and implementation process. To give administrative privileges to a new or existing user, enter the Users module in Admin Settings. On the create/edit user screen, select the admin check box to make that user a site admin. Continue reading the section below for more information on creating and editing users.

Assigning Administrative Privileges to a User
AMPED Admin modules are divided into the following sections:
Users & Access Management: The modules included in the Users & Access Management section allow administrators to create users and associate them to roles, profiles, and assign sharing rules that determine their permissions in terms of access to modules and records owned by other users. This section also contains modules that will allow the administrator to monitor users within the site.

Users and Access Management
Studio: Studio modules give the administrator the ability to determine which menus and modules appear on the site, create custom fields, modify the layout of the fields of a module, edit pick-list values, and set up mandatory fields.
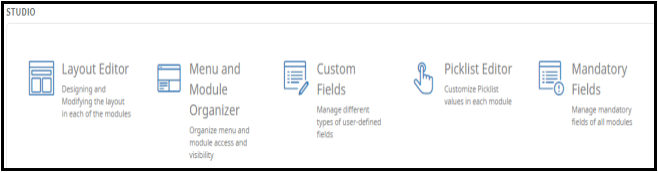
Studio
Communications: This section is related to the creation of marketing templates as well as the configuration of Webforms and Facebook Subscribe Me App.

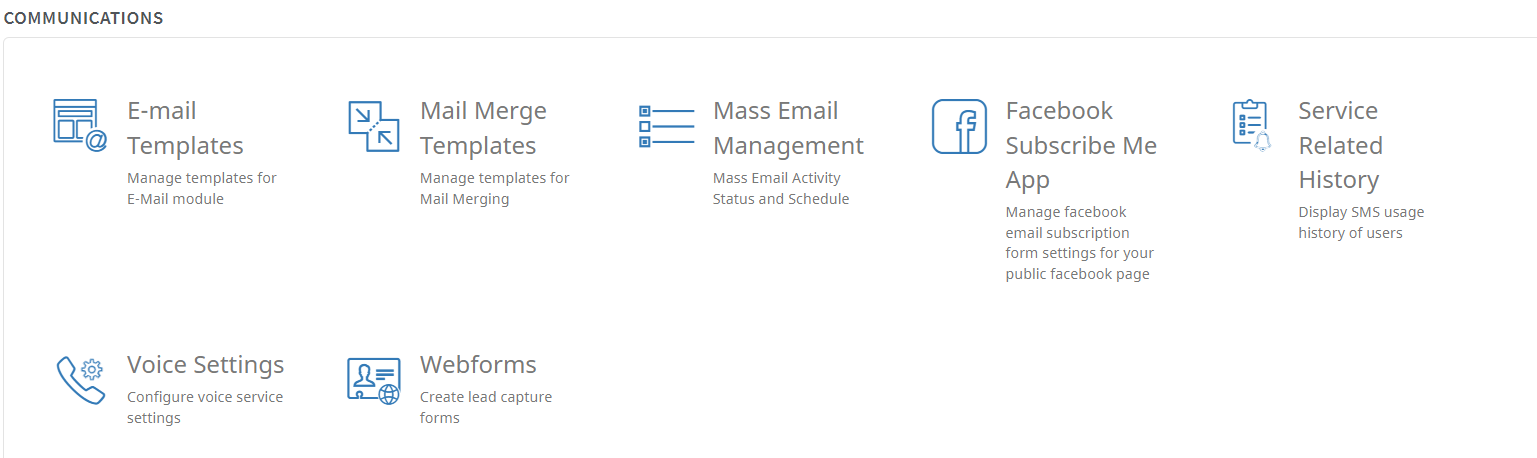
Communications
Other Settings: Other Settings include modules to configure the outgoing mail server, set up support email and ticketing options (if subscribed to Delyte), and configure workflow rules, among others.

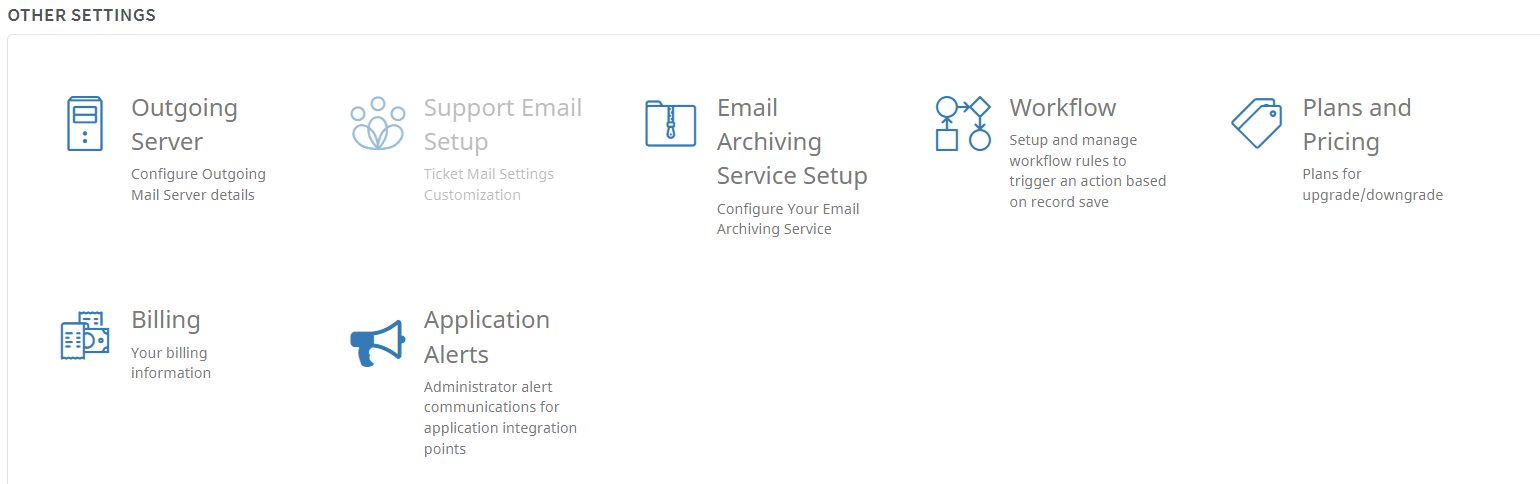
Other Settings
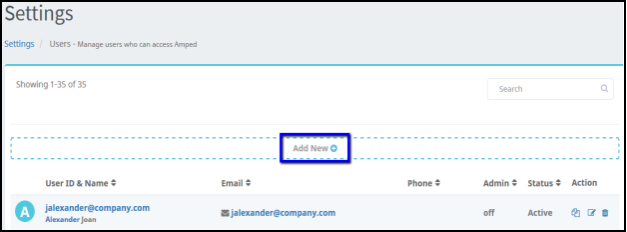
To access the Users module, first access the Admin menu and select the Users module from the Users & Access Management section.
When accessing the Users module, the list of active and inactive users will be displayed in list view with the following information per user:
- Username, First and Last Name, and Role
- Email address
- Phone
- Admin privileges: on/off
- Status: Active/Inactive
-
Action: Duplicate
 /Edit
/Edit
 /Delete
 User icons
Create a new user by selecting the ‘Add New’ button found at the top and bottom of the Users List.
Adding a New User
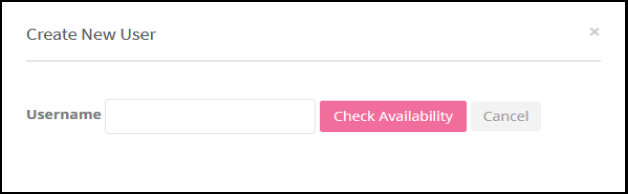
Creating a New User – Checking Availability of Username
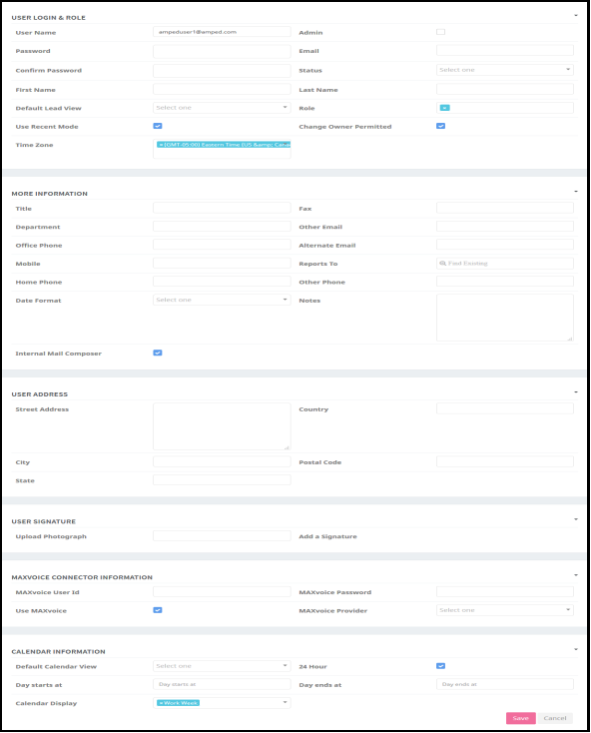
To create a new user, select the ‘Add New’ button, type in the desired username, and select ‘Check Availability’. AMPED will check if the login is available for the site. Username should be an actual email. If the username is available, the ‘Create New User’ screen will be displayed. On this screen, enter the information related to the new user: Password, First Name, Last Name, Email, Status, etc. The fields marked with a red asterisk are required.
Adding a New User – New User Page
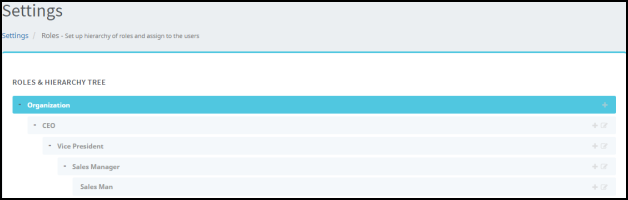
The user role represents the hierarchical position of the individual user within an organization. The user’s role plays a vital part in controlling record access. By default, the Roles & Hierarchy Tree has four roles that have the ability to be renamed, but they cannot be deleted. They are CEO, Vice President, Sales Manager, and Sales Man.
Role Hierarchy
Role hierarchies are displayed in a tree structure to depict the organization’s structure more accurately. Hierarchies can be expanded or collapsed by clicking the
![]() /
/
![]() symbols to the left of the role title.
symbols to the left of the role title.

Expand or Collapse Roles
Roles can easily be moved by clicking on the bar of a role and dragging it to the desired location.
Any role that is below another in the hierarchy will be moved together if the higher role is selected to be moved.
To edit a role, select the edit icon
![]() to the right of the role to display the edit role screen.
to the right of the role to display the edit role screen.
The edit role screen is the same as the ‘Create New Role’ screen. Edit the Role Name and associated Profiles and click ‘Save’.
To delete a role, hover over the role and select the delete icon
![]() on the far right of the role bar.
on the far right of the role bar.

Role Hierarchy – Add, Edit, Delete Icons
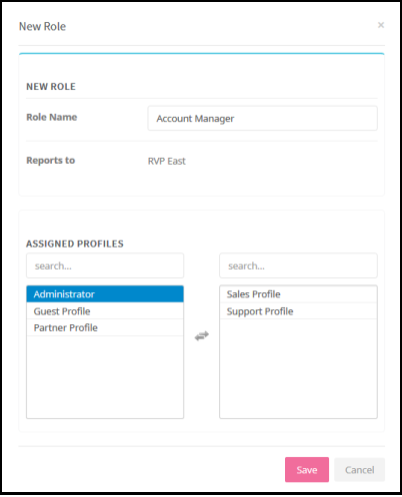
Additional roles may be created by hovering over a role that the newly created role will report to. Select the
![]() icon to display the ‘Create New Role’ page. Enter the name of the new role and select which profiles to associate with the new role. More than one profile can be associated with a role. In the event that a role has more than one profile associated with it, users in that role will have a blend of the access permissions granted in each role.
icon to display the ‘Create New Role’ page. Enter the name of the new role and select which profiles to associate with the new role. More than one profile can be associated with a role. In the event that a role has more than one profile associated with it, users in that role will have a blend of the access permissions granted in each role.
Create New User Role
Profiles provide specific access control to AMPED field modules and operations. One or more profiles can be associated with a role.
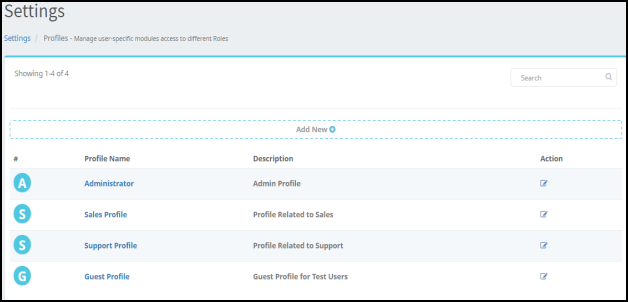
Profile Module – List view of all Profiles
There are four profiles by default. To view profile access permissions, simply click on the ‘Profile Name’. To edit existing profiles, click on the edit icon
![]() beneath the ‘Action’ column header. More profiles can be added by selecting ‘Add New’ and selecting this option will open the ‘Profile Privileges’ page. Enter the desired profile name and a brief description. Choose to base the new privileges on an existing profile; this is optimal for creating profiles in which only minor changes from an existing profile need to be made. Or, choose to construct privileges from scratch; this gives the ability to create a completely custom permission set. Click ‘Next’ to begin selecting privileges.
beneath the ‘Action’ column header. More profiles can be added by selecting ‘Add New’ and selecting this option will open the ‘Profile Privileges’ page. Enter the desired profile name and a brief description. Choose to base the new privileges on an existing profile; this is optimal for creating profiles in which only minor changes from an existing profile need to be made. Or, choose to construct privileges from scratch; this gives the ability to create a completely custom permission set. Click ‘Next’ to begin selecting privileges.
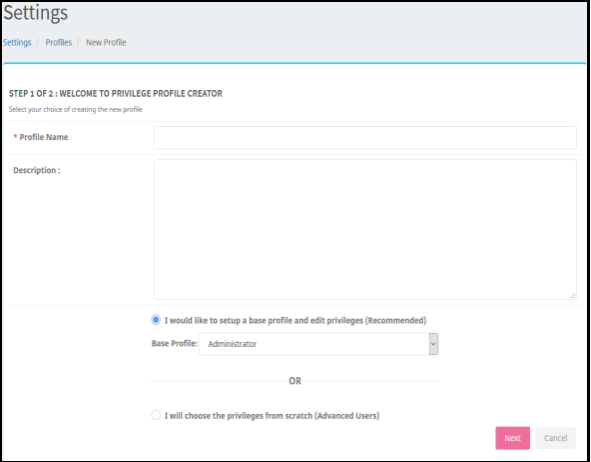
Creating a New Profile
Next, define the privileges for the new role. General ‘view all’ and ‘edit all’ options can be selected to grant a role viewing and/or editing permissions for all checked modules across the application regardless of the granular permissions defined in the following bullet points. To turn off a module for a specific role, simply uncheck the box to the left of the module name. Individual module permissions can also be created by checking or unchecking the ‘Create/Edit’, ‘View’, or ‘Delete’ options to the right of the module name.
- Create/Edit – allows all users in roles associated with this profile to create and edit records in the corresponding module belonging to themselves and their subordinates
- View – allows all users in roles associated with this profile to view all records in the corresponding module belonging to themselves and their subordinates
- Delete – allows all users in roles associated with this profile to delete all records in the corresponding module belonging to themselves and their subordinates (as defined by the role hierarchy).
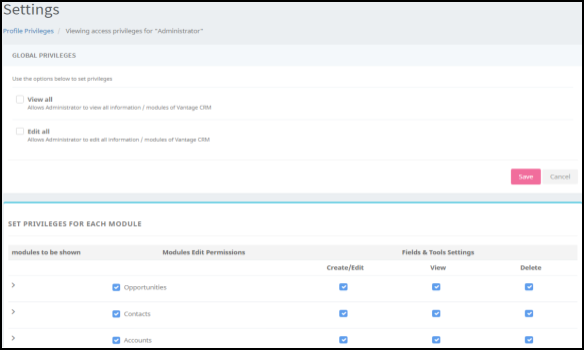
Defining Profile Privileges
To edit specific field permissions within a given module based on profile, select the expand/collapse arrow to the far left side of the module name. Select or deselect specific fields that are to be shown or not shown for users in roles associated with this profile. Operation tools for each module such as Import/Export, or duplicate handling, can also be enabled or disabled for a given profile. Once all selections are made, click the ‘Finish’ button located at the bottom of the page.
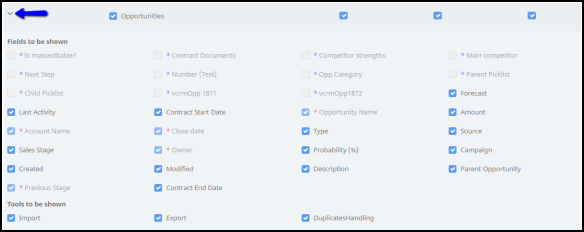
Expanding Profile Selections – Edit Mode

Click Finish to Save the Selected Privileges
Groups are a collection of users created to give ownership over one record to several individuals in a role or role subordinates, profiles, or existing groups. To edit an existing group, click the edit icon
![]() . To delete an existing group, click the trash icon
. To delete an existing group, click the trash icon
![]() . To create a new group, select ‘Add New’. The ‘Create New Group’ page will be displayed.
. To create a new group, select ‘Add New’. The ‘Create New Group’ page will be displayed.
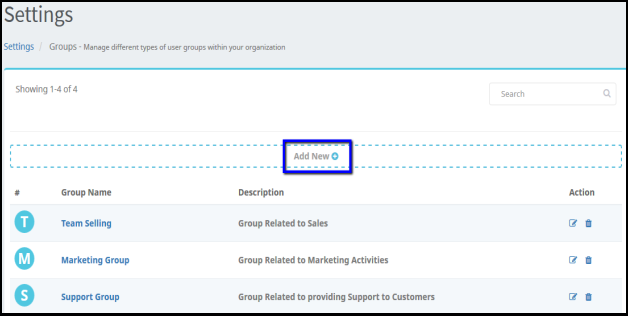
Adding a New Group
Enter the group name and a brief description of the group. Next choose members of the group by selecting a value from the ‘Entity’ dropdown. Entity dropdown values include:
- Groups – Combine existing groups into a new group.
- Roles – Select different roles
- Roles and Subordinates – Select users in a subordinate role in addition to their managers.
- Users – Select individual users across several different roles
Members from multiple entities may be combined to form a group. Once finished, select the ‘Add Group’ button.
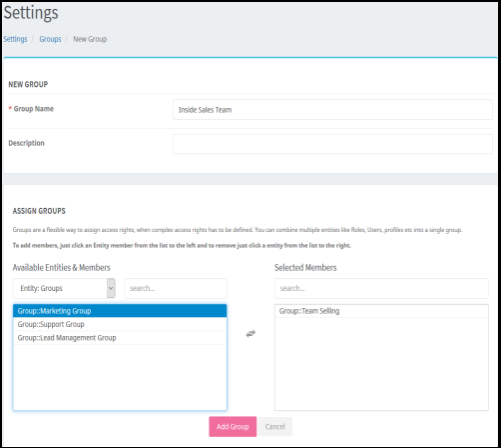
Adding a New Group
Sharing Access:
Module-specific sharing rules can be configured from the Sharing Access admin module. Amped’s sharing access module allows administrators to grant users access to other users records circumnavigating limitations imposed by the role hierarchy.
Sharing rules are divided into two groups:
- Organization-Level Sharing Rules – Organization-level rules are general sharing rules set for all roles within an organization.
- Custom Sharing Rules – Custom rules are sharing rules configured for specifically selected roles within an organization.
To edit an Organization-Level Sharing Rule, select the ‘Change Privileges’ button below the Organization-Level Sharing Rules.
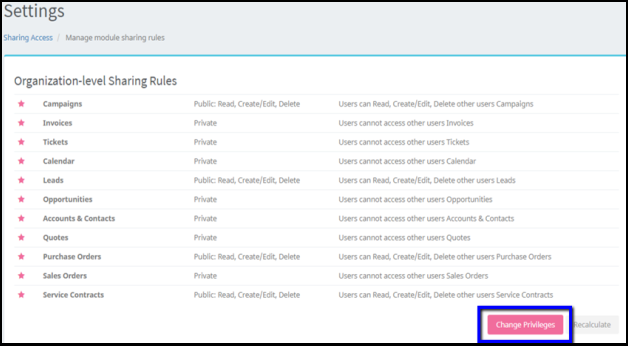
Editing or Changing Sharing Privileges
On the ‘Editing Sharing Access’ page, select a sharing rule from the dropdown for the desired module. Values include:
- Public: Read Only – Users can access and view all records from a given module belonging to other users.
- Public: Read, Create/Edit – Users can access, view, and create/edit all records for a given module belonging to other users.
- Public: Read, Create/Edit, Delete – Users can access, view, create/edit, and delete all records for a given module belonging to other users.
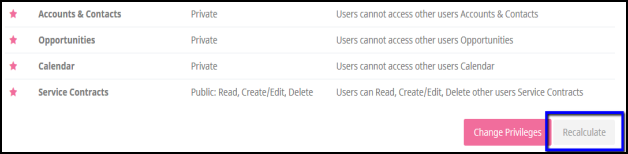
Once Organization-Level Sharing Rules are updated, select ‘Save Permissions’. To enable saved permissions for the site, click the ‘Recalculate’ button.
Recalculating Edited or Newly Added Privileges
To create Custom Sharing Rules, scroll through the page to select a module for the new rule. To edit an existing rule, select the edit icon
![]() . To delete an existing rule, select the trash icon
. To delete an existing rule, select the trash icon
![]() . To create a new rule, select the ‘Add New’ button.
. To create a new rule, select the ‘Add New’ button.
Adding a New Custom Privilege – Editing and Deleting Existing Privileges
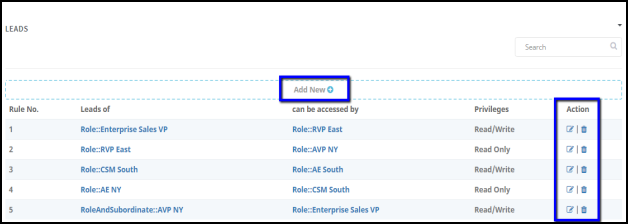
A pop-up will appear to add a custom rule. First, select an entity whose records may be accessed. Second, select an entity that will be given the access permission, and select the type of access they will be given. Lastly, select access rights for related modules. When done, select the ‘Add Rule’ button. To enable the new sharing rule, select the ‘Recalculate’ button on the top right-hand side of the page.

Creating a Custom Sharing Privilege – Leads Module
This module defines global access for fields within a module. Items displayed with an empty ‘Check Box’ are not able to be viewed by anyone in the organization, with the exception of users with admin privileges.
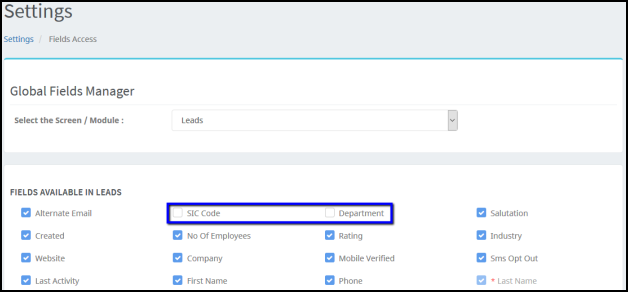
Global Fields Access Manager – Contacts Module
To edit field access for a specific module, first select the desired module from the dropdown. Then, select or deselect fields for viewing. Fields marked with a red asterisk ( * ) cannot be deselected. Auto-generated fields and fields in calendar are also unable to be deselected. To change a mandatory setting of a field, visit the Mandatory Fields module, which is located in the studio section of Admin Settings. Select ‘Save’ to save options.
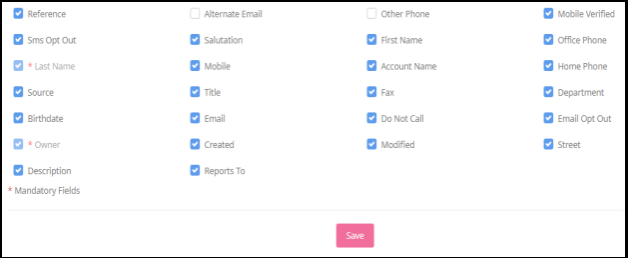
Global Fields Access Manager – Save Changes
This feature enables tracking of user actions on records within a module. Audit Trail tracking must be enabled for each user in order to obtain Audit Trail reports. All users are enabled by default. To generate an Audit Trail report, select the user by username from the dropdown and the Audit Trail will automatically populate for that user.
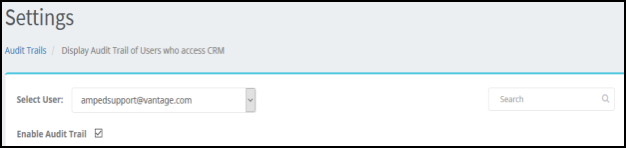
Select a User to View their Audit Trail
The Audit Tail report is then launched below. Select by page. All information is displayed by listing which module the action occurred in, the action, the record ID, and the action date.
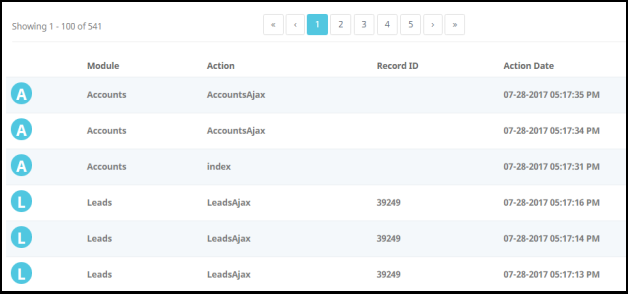
User Audit Trail
User login history is automatically captured. To view the login history for a particular user, select the user by username from the dropdown. The User Login History is available to be downloaded to an Excel document. Click the ‘Download’ button to export the data.

View User Login History
The Layout Editor enables the Admin to designate the display location of fields within a module in a way that benefits the workflow of the company. The Admin can create new sections or blocks within a module and move and organize fields within the blocks.
To access the Layout Editor, visit the Admin Settings and select it from the Studio Section.
To view a particular module within the Layout Editor, select the module from the dropdown menu: ‘Select Module’. The page will then display the blocks and fields in the same way that they appear in a module record. Please note, that due to different field permissions based on profile, layout will often include additional fields that are not visible to users in certain roles.
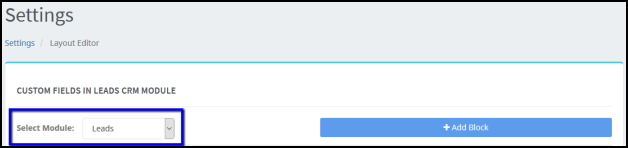
Layout Editor
Each block in the Layout Editor is a different section displayed on the respective module page.
Below are the functions available on each block.
- To add a block, select “Add Block” to the right of “Select Module”.
-
To move a block up or down within the Editor, click the arrows

 on the desired section.

Moving a Block
- Show/Hide display settings of the block allow to display or not display the fields within a block. Display settings are set to show by default. To hide a specific block globally, select ‘Hide’ from the dropdown.

Show or Hide Block Fields
-
Clicking the “eye” symbol
 shows the Hidden Fields of the block.
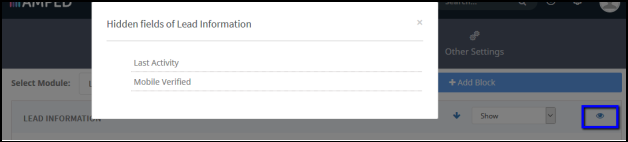
View Hidden Fields of a Block
- Fields in a block are able to be moved by hovering over the desired field, clicking and dragging.
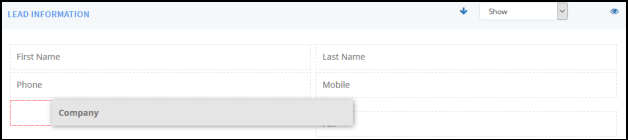
Dragging and Dropping a Field within a Block
The Menu and Module Organizer enables the Admin to globally disable Menu Items and Modules, customize the appearance of modules within a dropdown menu, customize visibility of modules on the record page, and customize menu and module text labels.
The Menu and Module Organizer can be accessed in the Studio section of the Admin Settings.
The “Organize” tab displays the enabled and disabled modules as blocks.
The order in which the blocks are displayed is the order your left side menu will display throughout the application.
To move a module, simply select the module then drag and drop it to the desired placement.
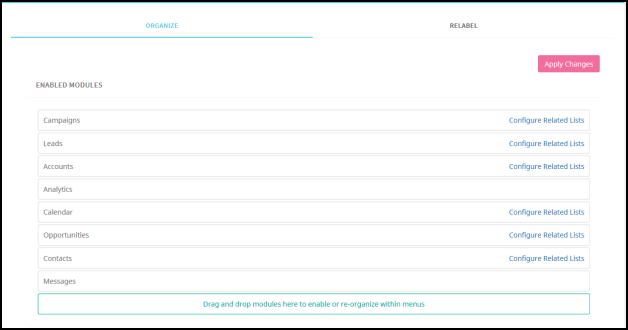
Enabled Modules – Drag and Drop to Reorder
To disable a module globally, select the desired module and drag it to the ‘Disabled Modules’ section at the bottom of the Organize page.
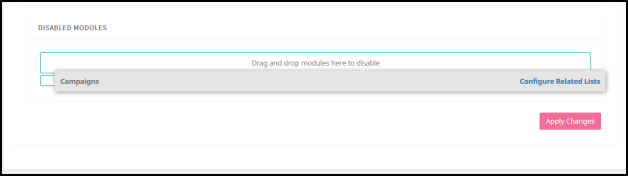
Disabled Modules Block
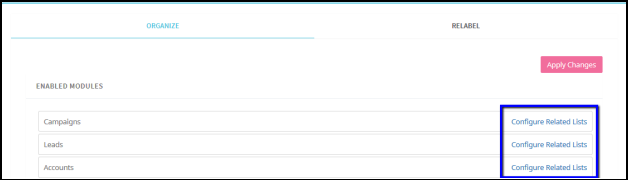
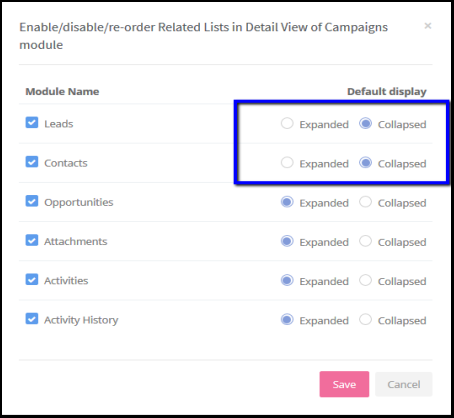
To configure module associations and visibility on specific record pages, select the ‘Configure Related Lists’ link on the end of the module to be configured. Once selected, a pop-up will appear with configuration settings.
Configure Related Lists within a Module
Configure Related Lists – Disabling Modules
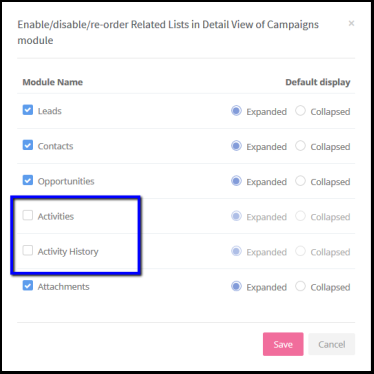
Modules can also be set to display as expanded or collapsed by selecting the respective radio button options. If a module is set to display in an expanded view, the user viewing the record page will view information in the table format seen below. If a module is set to display in a collapsed view, the user viewing the record will see the header name for the module but will need to first click the blue ‘Plus’
![]() button to view information in the table format.
button to view information in the table format.
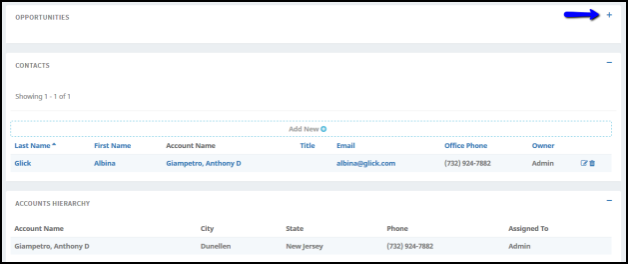
View of Record with Opportunities Block Collapsed – Click the ‘Plus’ to Expand
Configure Related Lists – Expand/Collapse Related Block Information
Modules may also be reordered by dragging and dropping within this pop-up. Once finished with the configurations, select ‘Save’ at the bottom of the pop-up.

Configure Related Lists – Drag and Drop Related Modules
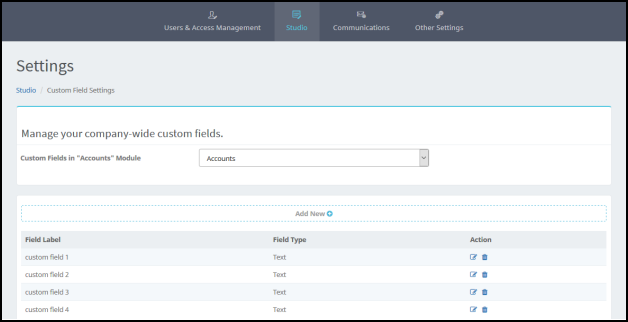
The Custom Fields settings can be found in the Studio section of the Admin Settings.
The Custom Field Settings module allows the admin to do the following:
- Check the list of custom fields created per module.
- Create custom fields within each module.
- Edit the name of an existing custom field.
- In the case of Leads, it allows mapping of the custom fields and field values in Leads module with field(s) and field values of Accounts, Contacts, and Opportunities modules.
The custom fields are organized by module. Select a module by clicking the dropdown located at the top of the Custom Fields page. After selecting the module, a list of existing custom fields within the module will display. From this list/page, the admin will be able to perform any of the tasks listed: view, add new, edit
![]() , and delete
, and delete
![]() a custom field. In the case of Leads custom fields, it will display the list of the Leads module fields and the corresponding mapped fields to the modules of Accounts, Contacts, and Opportunities.
a custom field. In the case of Leads custom fields, it will display the list of the Leads module fields and the corresponding mapped fields to the modules of Accounts, Contacts, and Opportunities.
List View of Custom Fields – View, Add New, Edit, and Delete Custom Fields
How to Create a Custom Field:
To create a custom field, select “Add New” from the top or bottom of the custom field list view. This will prompt the “Create Custom Field” window to pop-up.
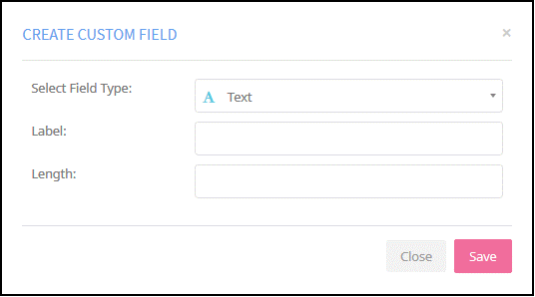
Creating a Custom Field
Within this pop-up, add a label and select the type of field from the dropdown. The options and requirements for each field type are:
- Text
- Number
- Percent
- Currency – Enter the maximum number of digits to be stored, as well as decimal places. (Example: To enter the number 100.00 into a numeric field, length would be 3 with 2 decimal places.)
- Date
- Phone
- Pick List
- URL
- Checkbox
- Text Area
- Multi-Select Combo Box (multiple selections can be made) – Dependent picklists can be made and will be addressed in a later section.
- Skype
Additional Information and Field Requirements:
- Text Fields – Enter the length or maximum number of characters that are to be stored in this field. The character limit on this field is 255 characters. If 255 characters are not sufficient, the Text Areas have no character limit.
- Percent – The numeric percent value defaults to include 2 decimal places.
- Currency – Enter the maximum number of digits to be stored, as well as decimal places. (Example: To enter the number 100 into a numeric field, length would be 3 with 0 decimal places. For currency, input 2 decimal places.)
- Picklist – Add the list of values. Hit enter in between values to separate values in the list. There will be a constant ‘Select One’ on all picklist fields to let users know to choose a value from the picklist.
- Multi-Select Combo Box – This type of field allows users to select more than one option. Add the list of values and use “Enter” on the keyboard to separate values. The Multi-Select Combo Box will display “Select Values” to let users know to choose one or more values from the picklist. If a value is not chosen upon save of a record, the Combo Box will appear blank.
Please note that Picklists and Multi-Select Combo Boxes may also serve as Parent or Children Picklists for creating Dependent Picklists, which will be addressed in the next section. After selecting the type of field, add other requirements depending on the type of field and select ‘Save’. The new field will appear on the list of custom fields within the module. Once created, the new custom field will appear under the ‘Custom Information’ block on the record page until it is moved using the layout editor.
Creating Dependent Picklists:
To create a Dependent picklist, a Controlling picklist must first exist. The Controlling picklist may be a standard or custom field. If the desired Controlling picklist does not exist, create the picklist following the instructions for creating a custom field, above. Controlling picklists must be Picklist or Multi-Select Combo Box fields.
To create the Dependent picklist, first select the module in which the Controlling picklist exists and select ‘New Custom Field’. In the ‘Create Custom Field’ pop-up window, select the field type as either Picklist or Multi-Select Combo Box. Before entering picklist values in the box provided, select the checkbox for ‘Dependent picklist’.
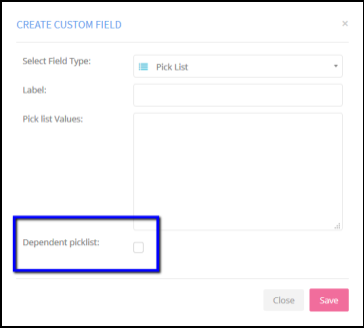
Creating a Dependent Picklist
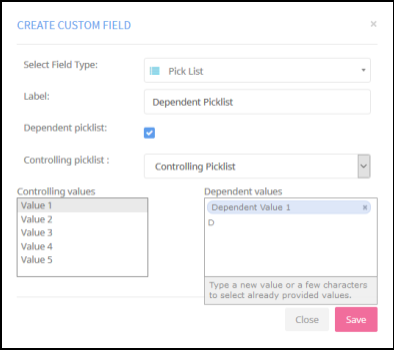
Once the box is checked, the “Create Custom Field” pop-up will expand to show mapping values for Controlling and Dependent relationships. Select the Controlling picklist from the dropdown. Once the Controlling picklist is chosen, the values will appear in list view to be mapped. Select each value of the Controlling picklist in the left pane, and type mapped Dependent values in the right pane. If the same Dependent value is being mapped to more than one Controlling value, the editor will suggest entries to ensure consistency of spelling.
In the example below, ‘Controlling Picklist’ has been selected as the parent. ‘Value 1’ from the Parent Picklist has been selected for mapping, ‘Dependent Value 1’ has been entered, and ‘Dependent Value 2’ is still being typed and in edit mode. Values are entered by hitting the ‘Enter’ key on the keyboard. To delete a value from a Child Picklist, simply hover over the blue entry and click the ‘X’ icon that appears in the bar.
Mapping Dependent Picklist Values
If the Controlling field is a Multi-Select Combo Box, then the mapped Dependent values will be a blend of values mapped for multiple selections.
Controlling picklists are only able to be edited once created through the Picklist Editor module within Admin Settings. Dependent picklists are not able to be edited in Picklist Editor to ensure that value mapping is done properly. All Dependent picklists must be edited within the Custom Field module.
Dependent picklists will not be included in permission checking based on roles. This means that if the field is viewable to a certain profile, view of values cannot be customized due to profile or role.
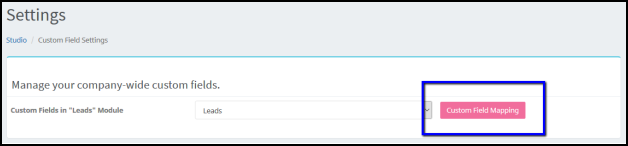
Custom Field Mapping:
When creating a field within the Leads module, it is important to create the same field within the Accounts, Contacts, or Opportunities modules when preservation of information is desired upon Lead Conversion. Mapping can be completed by selecting the ‘Custom Field Mapping Button’.
Map Custom Field Values from Leads to Accounts, Contacts and Opportunities
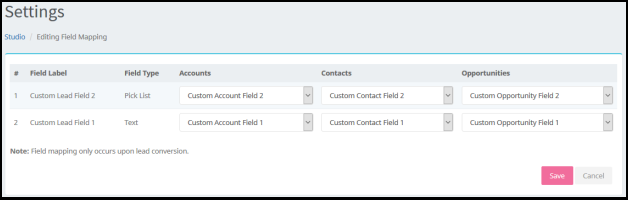
Select the field for values to be mapped to upon Lead Conversion, by selecting a field name in the dropdown. In order for fields to be mapped over, the field type and field values (if picklist or multi-select combo box) must be the same in mapping modules.
Mapping Lead Fields to Selected Module Fields
Editing the Name of an Existing Custom Field:
To edit the name of an existing custom field, click the ‘edit’
![]() icon under the Actions column next to the desired custom field. It will display a pop-up window where the name of the field may be changed.
icon under the Actions column next to the desired custom field. It will display a pop-up window where the name of the field may be changed.
In the case of fields such as text fields, numeric and currency fields, picklist, and multi-select combo box, the pop-up will also display the characteristics of the field. It is not possible to edit the length of characters, number length, or number of decimal places once a field is added. To edit picklist or multi-select combo box values, go to the Picklist Editor Module in Admin Settings.
Delete an Existing Field:
To delete a custom field, click the ‘Delete’
![]() icon located to the right of the field name
icon located to the right of the field name
The Mandatory Fields module allows the Admin to specify which fields must contain a value upon saving record. To access the Mandatory Fields module, go to the Admin Settings page, scroll to the studio section, and select ‘Mandatory Fields’.
To view the list of mandatory fields for a particular module, select the module from the ‘Select the Screen/Module’ dropdown. All mandatory fields will be represented with a check mark
![]() . Empty checkboxes indicate fields that are
not
mandatory.
. Empty checkboxes indicate fields that are
not
mandatory.
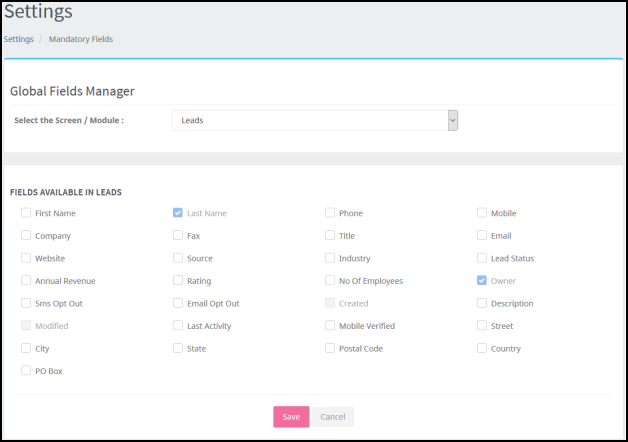
Mandatory Fields – Global Field Manager
The mandatory field selection is defaulted to the edit mode. To make any changes, first select the desired module. Make a field mandatory by checking the box next to the field name; similarly fields can be made not mandatory by removing the checkmark from the box. Certain fields within each module do not have the ability to be made not mandatory. These will remain mandatory but can be hidden via Fields Access module selections if not needed.
Mandatory fields will play an important role in the import process. It is essential to have knowledge of all mandatory fields upon import and to ensure that the admin has these fields filled out in each import document.
The Email Templates module is used for adding and managing email templates used for communications through the Campaigns module and Mass Emailing.
To access the Email Templates module, go to the Admin Settings page, scroll to the Communications section, and select the ‘Email Templates’ module.
Pre-loaded templates will appear in list form in the Email Templates module. To add a new template, select “Add New” from the top or bottom of the list view. Select the ‘Edit’
![]() icon or the ‘Delete’
icon or the ‘Delete’
![]() icon under the Actions column to make changes to or delete saved templates.
icon under the Actions column to make changes to or delete saved templates.
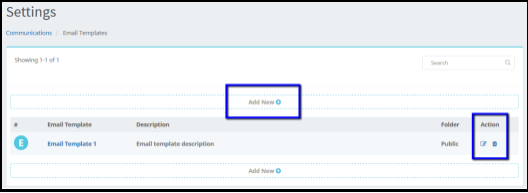
Email Template List View – Add New, Edit or Delete Email Templates
On the New Email Template page, enter the ‘Name’ and a ‘Description’ of the template so that it can be easily identified from the list of templates. Select a folder to save the template to. Saving the template to the ‘Public’ folder will make the template public to all users within the organization, while saving the template to the ‘Admin Only’ folder will make it only available to the administrator’s personal account.
Next, enter the default subject for the email when it is sent. Finally enter the desired message in the space below.
Merge fields can also be added into the email message by using the ‘Select Field’ type area. There are three steps to add a merge field:
- Select the Record type to pull field values from. Options include: Account fields, Contact Fields, Leads Fields, User Fields, and Facebook Fields. User Fields pertain to personal account fields located in the ‘My Preferences’ section of the site.
- Select the field to pull values from in an individual record.
- Upon selecting the field, a merge field value will automatically populate in the empty textbox to the right. Copy the merge field and paste it to the desired location in the message body by using ‘Ctrl + V’ on your keyboard.
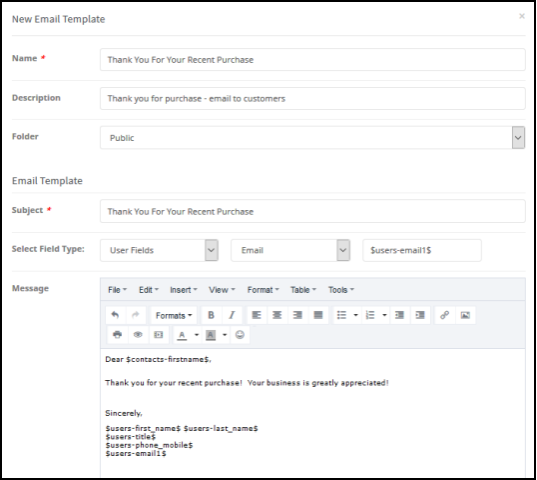
Creating a New Email Template
To create an HTML template, select ‘Source Code’ from ‘Tools’ dropdown and paste the HTML code in the available space. Enter merge fields in the text space of the template following the instructions above. Save the template by selecting ‘Save’ in the bottom-right corner of the edit window.

Selecting ‘Source Code’ from Tools Dropdown
The saved email template will be available immediately for use. From the Email Compose Window, find ‘Add Template’. Begin typing out the name of the template or select ‘Find Existing’ to view a list of all templates.
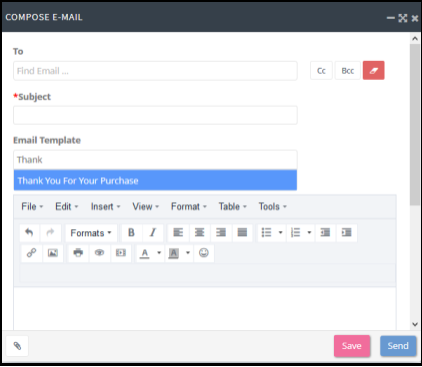
Selecting the Email Template from the Email Compose Window
To create a mail merge document in MS Word, the admin will need to create a document with AMPED Mail Merge field values. Mail Merge values are not the same as Email Merge fields. Mail merge fields must match the module of the intended use of the merge document. (Example: If the merge document will be used to mail Contact records in the Contact module, the merge fields must be Contact fields as listed in the Mail Merge Supported Fields list.) The Mail Merge Supported Fields list is provided by the AMPED product owner/implementation specialist. If this document was not provided during implementation, please email ampedsupport@vantage.com to request a copy. Once the merge document is completed, save the file as a .doc document. All merge documents must be in .doc format to pull information correctly. Mail merges can only be performed in the Internet Explorer Web browser.
Creating a Mail Merge Template in Microsoft Word (2010/2013)
To create a mail merge template using Microsoft Word, first create the document that you wish to send out to your AMPED Leads, Accounts, Contacts, or Trouble Tickets. Then place the cursor where you would like to place a Mail Merge Field.
Locate the ‘Insert’ tab in the Microsoft Word toolbar.
In the text section of the ‘Insert’ tab, select ‘Quick Parts’ and then ‘Field’. This will open the field dialog.
Under Categories, select ‘Mail Merge’, then in the Field Names section select ‘MergeField’.
In the ‘Field Names’ section that appears, enter the name of the merge field that you would like to insert. For example if you would like to insert the Contact’s First Name, enter CONTACT_FIRSTNAME.
Select ‘OK’ to have the merge field inserted into your document.
For example, if you entered contact first name, the mail merge field will appear as <<CONTACT_FIRSTNAME>>.
To check the formatting of the merge field, you can press ‘ALT + F9’. The format should look like «CONTACT_FIRSTNAME».
Creating a Mail Merge Template in AMPED
The Mail Merge Templates module allows management of mail merge templates used for communications.
To access the Mail Merge Templates module, go to the Admin Settings page, scroll to the Communications section, and select ‘Mail Merge Templates’.
Pre-loaded mail merge documents are presented in a list with the template file name, description, and module that the document pulls information from. To view a merge document, click the ‘Download’
![]() icon under the Action column to the right of the desired document. To delete a merge document, select the ‘Delete’
icon under the Action column to the right of the desired document. To delete a merge document, select the ‘Delete’
![]() icon under the Action column to the right of the desired document.
icon under the Action column to the right of the desired document.
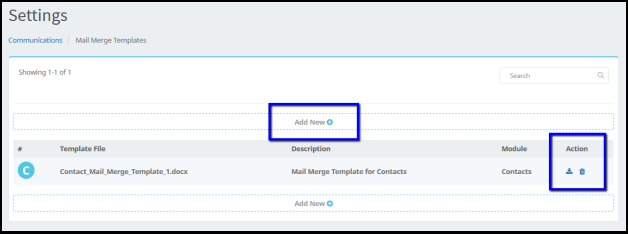
Mail Merge Template List View – Add New, Download, and Delete
In the ‘New Template’ window, upload the mail merge file by selecting ‘Browse’ or drag and drop the file into the ‘Browse’ section. Enter a description for the new template to make it easier to identify in the module list. Finally, select the intended module for use from the ‘Module’ dropdown. Once finished, select ‘Save’. To exit the window, select ‘Cancel’.
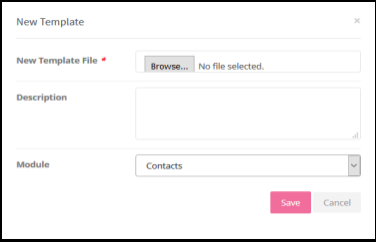
Adding a New Mail Merge Template
To use the new Mail Merge Template, visit the list view page for the intended module. Make record selections from a loaded filter; the user is able to navigate across pages within a filter, and record selections will be saved. Once through selecting records, find ‘Select Actions’ in the top left of the list view page and select ‘Mail Merge’ from the dropdown. Select the desired .doc document. This will launch with all information corresponding to merge fields populated in the document.
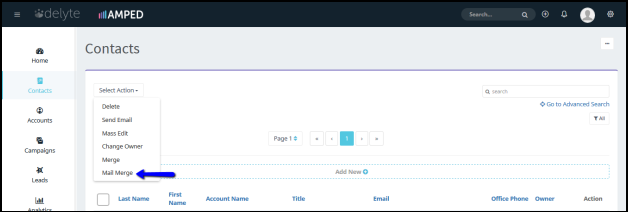
Select Mail Merge from ‘Select Actions’
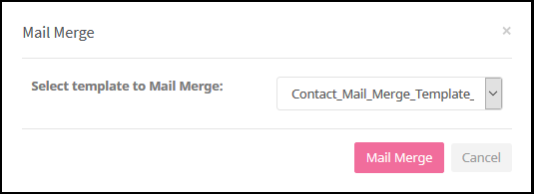
Select the Mail Merge Template
Mass Email Management:
The Mass Email Management module allows management to view and modify mass email activity status and scheduled mass email blasts.
To access Mass Email Management, go to the admin settings page, scroll down to the Communications section, and select Mass Email Management.
Existing scheduled mass email blasts are presented in a list with the campaign name, owner, subject, recipients, scheduled date and time, and status of the scheduled mass email blast. To view a scheduled mass email blast, click the edit icon under the action column. To delete a scheduled mass email blast, select the delete icon under the action column.
Scheduled emails will go out if not canceled 10 minutes prior to their scheduled time. You may not cancel a scheduled email that is already in progress.


Mass Email Sending
Facebook Subscribe Me App:
Facebook Subscribe Me App allows management to manage Facebook email subscription form settings for public Facebook pages.
In the admin settings, scroll down to the Communication section and select the Facebook Subscribe Me App.
Existing subscribers are displayed in a list view with their first name, last name, email address, zip code, synced, source, and subscribed. Click the Authenticate Facebook Account button to verify your Facebook account. Click Login to Facebook to log in.

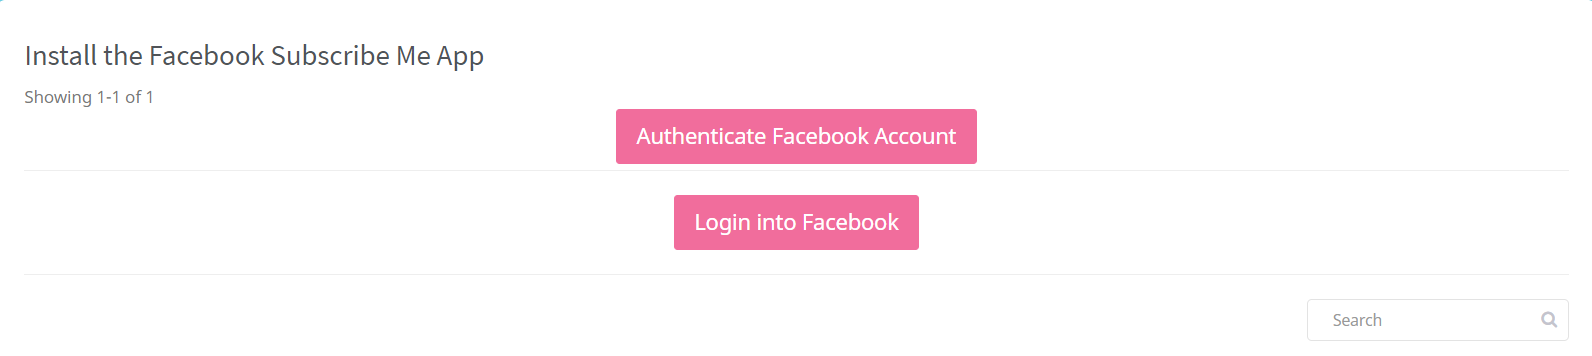
Facebook Subscribe Me App
Service-Related History:
Users can view their SMS usage history through the Service-Related History module.
To view service-related history, scroll down to the communications section of the admin settings and select it.
Existing SMS messages are displayed in a list view along with their name, from, to, message, type, and created time. To filter by sent and received messages, select the SMS type drop-down menu. You can download the records by clicking the Download button on the right-hand side. To view the message in full, select the subject of the message.
![]()
![]()
![]()
![]()


Service-Related History
Voice Settings:
The Voice Settings module allows users to configure their voice settings. The voice settings can be viewed in the communications section of the admin settings.
In Voice Settings, management can customize Twilio's voice service settings. Enter the account Sid and Auth Token to enable Twilio Voice Service.

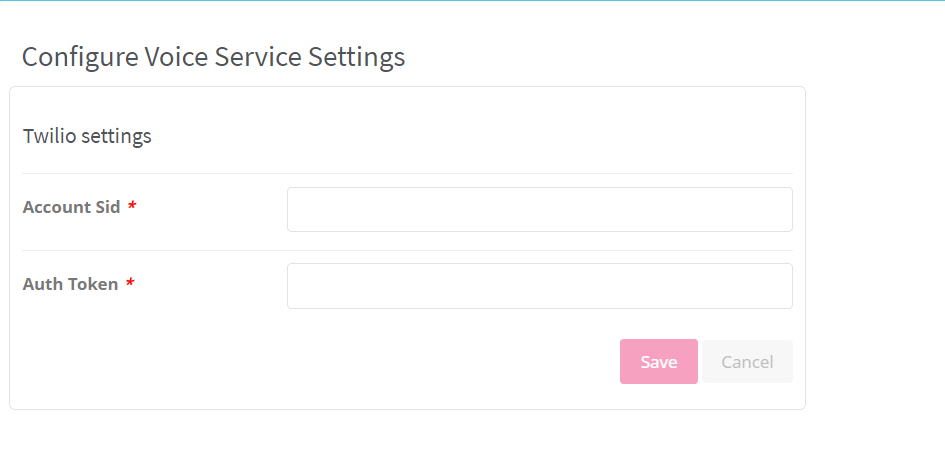
Voice Settings
Webforms:
Administrators can create custom web forms in AMPED and embed them into marketing websites for lead collection.

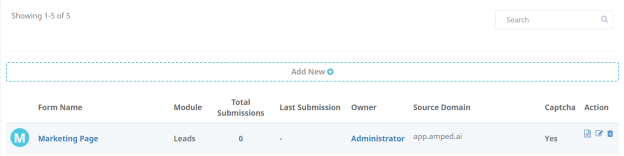 Click on the Web Forms module in the admin settings, and you will see any saved Web Forms listed here with the option to preview the embedded code, edit, and delete.
Webforms
Create a new Web Form by selecting add new. This will open a new Web Forms window. As a first step, name the webform.

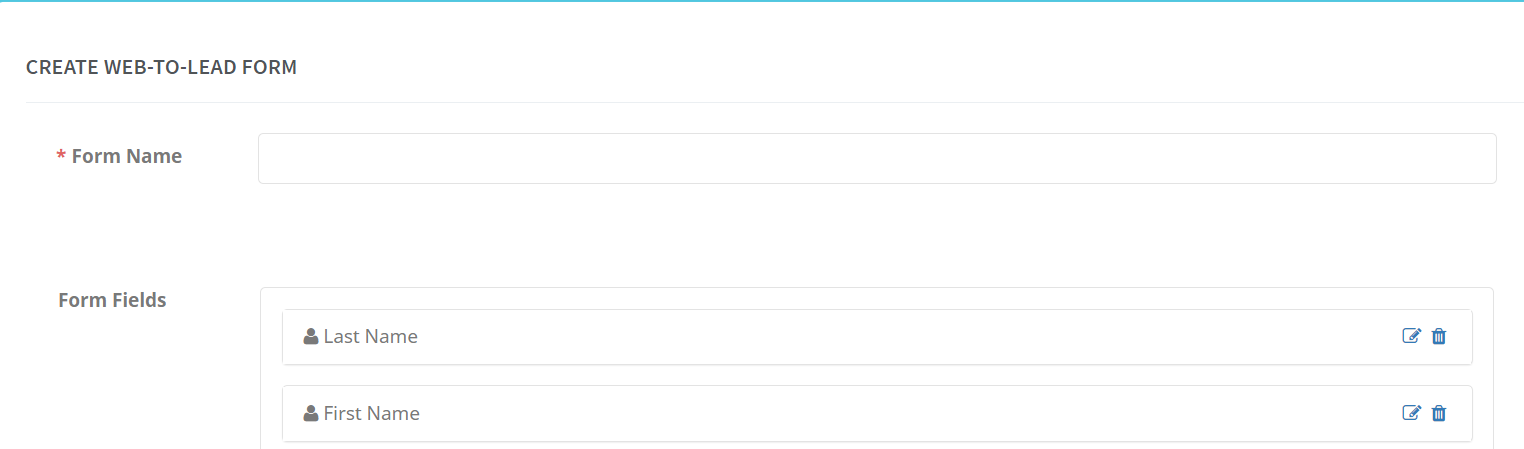 Webforms

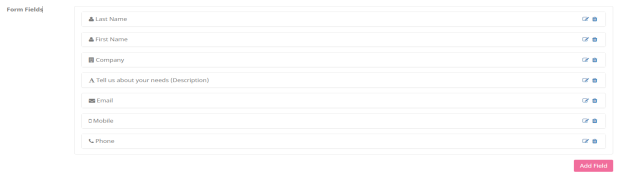 In form fields, select the fields that you want to include. To do this, select "Add Field" in the bottom right corner.
Webforms
Field-displayed names can be edited by selecting the edit icon. The field can also be set as mandatory by selecting the “set mandatory” checkbox.

 Webforms
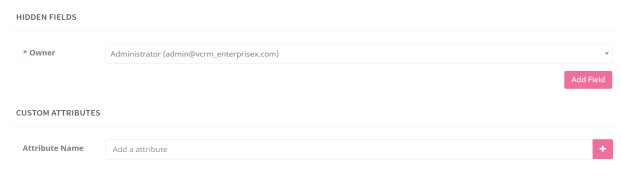
Select the owner of the Web Form. To do this, scroll down to the hidden fields block and select the owner dropdown to choose the owner of the Web Form.

Webforms
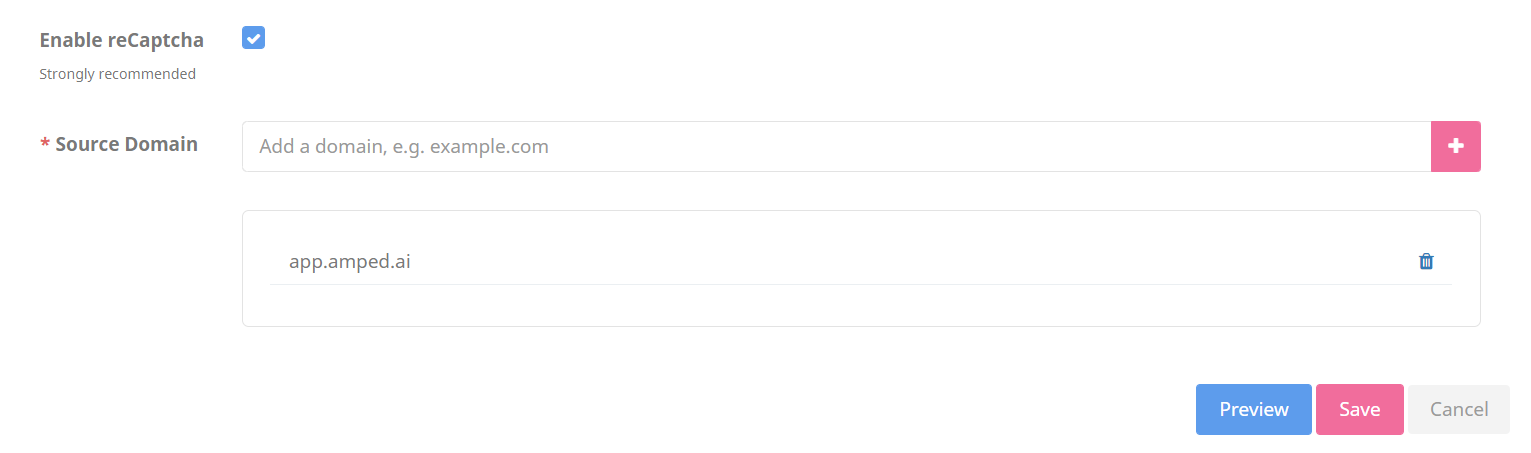
Your source domain should be entered in the domain block. To add the source domain, click the plus sign on the right-hand side. The source domain acts as an additional form of security and protects web form lead creation.
Take note: best practices recommend enabling reCAPTCHA to help protect against spam and abuse

 Webforms
Users can configure their web forms to accept dynamic values passed to the form and AMPED via the embedded code url so they can more effectively track channel traffic. These custom attributes are used to pinpoint specific sources of traffic to a website. They may also contain keyword terms and content identifiers. This helps you determine which of your marketing campaigns are successful
The custom attributes may be modified of the URL of the iframe source code once added. This can be done by Java script or when the page is rendered by any web designer. The values of those custom attributes will be populated by the values you input.

 Webforms
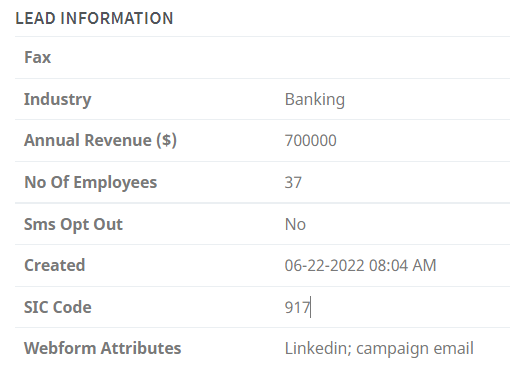
Webform Attributes" is a standard field in Lead Information block. As a value of the Webform Attributes field, you will receive all the custom attributes separated by a semicolon (source: Linkedin; campaign: email) from your web form.

Lead Information Block
Once you’re done, select preview to preview the Web Form. If you would like to change the order of the fields. Scroll up to the form fields section and simply drag and drop the field value to your desired location.
 To incorporate the Web Form into your website. Add the embed code to the website source code. First, select the embedded view icon under the action column and select the copy to clipboard button to copy the embed code.
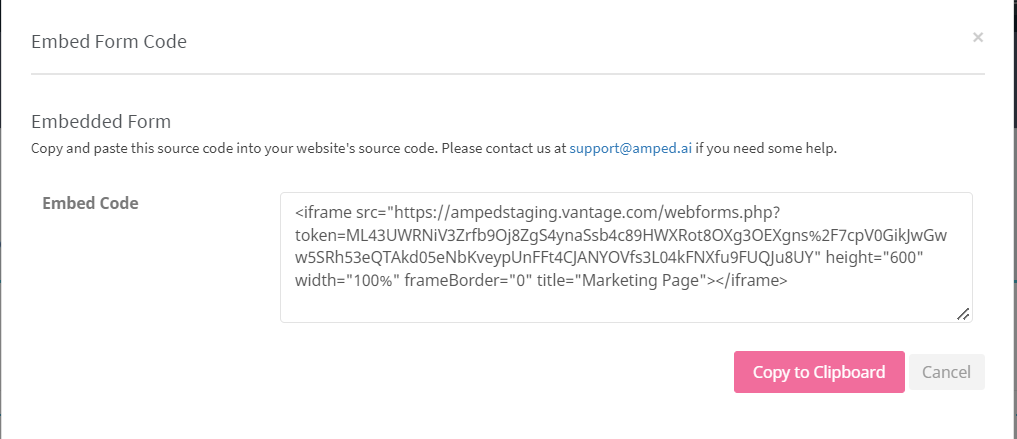
Embedded Form View
Open the website’s source code that you would like to add the form to. You can do this by right-clicking the website and selecting “view page source”.
In Source code scroll down to the contact page section and paste the embedded code below. Save the source code. Note the owner of the website or hosting page must size the form to their preference.
If you need assistance in implementing a web-to-lead, please contact support@amped.ai for assistance.
The Company Details page contains contact information for the organization. It is important to have company details configured for the Mass Email Unsubscribe landing page to display company name.
To access the Company Details page, go to the Admin Settings page, scroll to the ‘Other Settings’ section, and select ‘Company Details’.
Enter the company information in the textboxes provide for each line item, then hit ‘Save’.
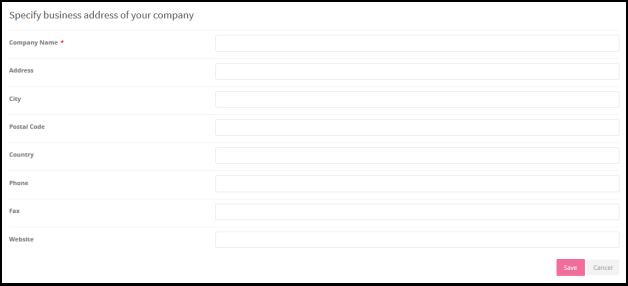
Company Details Settings Page
General
AMPED Outgoing Server configuration allows the organization to send emails directly from their own email server. To send emails from AMPED, the Outgoing Mail Server must be configured. To access the Outgoing Server configuration page, please select Admin Settings from the menu bar. Scroll to the bottom of the page and select ‘Outgoing Server’ in the ‘Other Settings’ section. Enter the mail server information in the textboxes provided for each line item.
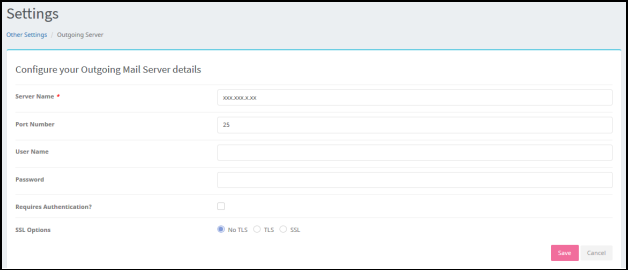
Configuring the Outgoing Server Settings
- Server name or IP address – Enter the address of the mail server that will be used. You may use a name or the IP address (mail.yourdomain.com).
- Port number – This is the mail server port number (default: 25).
If your system requires authentication, enter the username and password of the admin account for the system and check the box ‘Requires Authentication?’.
Enable TLS or SSL options as they correspond to the outgoing email server.
Once server details are entered, hit ‘Save’ to enable.
To enable outgoing server settings for Gmail:
To enable outgoing server settings for Gmail, first enable IMAP or POP in your Gmail Mail Settings. Do this by clicking the sprocket icon and selecting Mail Settings in your Gmail account. On the settings tab, select Forwarding POP/IMAP and select to Enable POP or IMAP for all mail according to your preferences, and click ‘Save’.
In AMPED, go to the Admin Settings
![]() from the top right corner of the application. Scroll to the bottom of the page and select Outgoing Server. Enter your mail server configuration and hit ‘Save’.
from the top right corner of the application. Scroll to the bottom of the page and select Outgoing Server. Enter your mail server configuration and hit ‘Save’.
|
Outgoing Mail (SMTP) Server – Requires TLS or SSL: |
smtp.gmail.com (use authentication) Use Authentication: Yes Port for TLS/STARTTLS: 587 Port for SSL: 465 |
|
Account Name: |
your full email address (including @gmail.com or@your_domain.com) |
|
Email Address: |
your email address (username@gmail.com orusername@your_domain.com) |
|
Password: |
your Gmail password |
https://support.google.com/mail/bin/static.py?hl=en&ts=1668960&page=ts.cs
When entering your information, follow the instructions above provided in the Gmail Outgoing Server directions.
Configuring Outgoing Server to Gmail settings requires authentication. Enter your username and password and select the ‘Requires Authentication’ check box. Also check SSL or TLS in correspondence with the port number you have entered. Click ‘Save’.
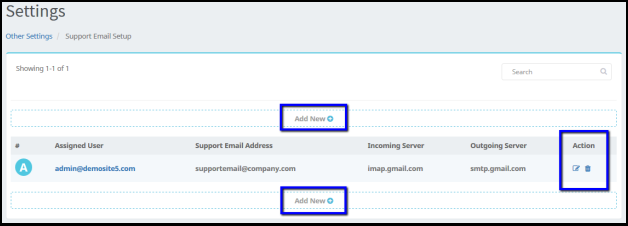
Support Email Setup
Only sites with a Delyte subscription will be able to create company support email addresses.
To configure the support email address, navigate to the Admin Settings Menu and scroll down to select ‘Support Email Setup’ from the ‘Other Settings’ section.
After Clicking ‘Add New’, you will be given two options to configure the support email setup. Either manually enter the address information or authenticate using Outlook oAuth2. Outgoing and Incoming Server information can be found through your email service provider settings. You may need to check with your IT department or firm to confirm this information.
Support Email Setup – List View
To authenticate with Outlook oAuth2, click the Microsoft Office button and choose the Microsoft account you wish to connect to.

Microsoft Outlook Button – Support Email Setup

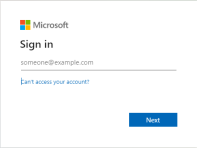 Enter the Microsoft Outlook account credentials to authenticate.
Microsoft Login Window – Support Email Setup

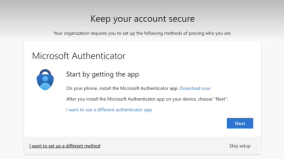 A pop-up will appear asking for more information. As soon as you click “Next”, you’ll be given the option of authenticating your account or skipping it. Choose “Next” to authenticate or “Skip” to continue.
Microsoft Authenticator – Support Email Setup
Upon successful authentication or skipping, you will receive a message stating “Successful authentication. Enter the mail settings and save it.”
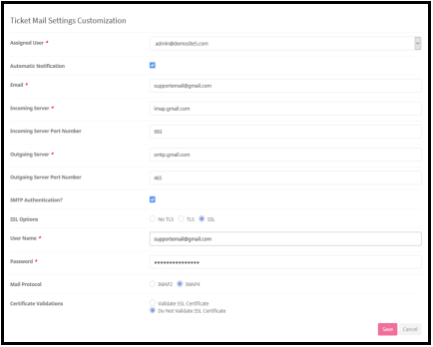
Each support email must be assigned to a user. A user may have more than one support email assigned to them.
The Username and Password fields relate to the specific login credentials of the email account you have entered in the ‘Email’ field of the settings. In the image below, the Username and Password would be the credentials to log into the Email ‘supportemail@company.com’.
Delete an Existing Field:
Use the ‘Action’ buttons to ‘Edit’
![]() or ‘Delete’
or ‘Delete’
![]() a support email.
a support email.
The image below displays the information needed to add a new support email address. The image shows the credentials for configuring a Gmail account.
The email archiving feature in AMPED provides the client company with the flexibility to utilize the email platform of their choice when associating email activity records. Once the site administrator has configured the Email Archiving Service account, site users may begin to include the address in business communications to track important email conversations for future reference.
How it works:
- Construct email to intended recipients
- Include archive address in the To, Cc, or Bcc fields
- For exact email address record matches, an email activity association will be automatically generated on that Lead, Account, or Contact record. For email addresses that match multiple records, the user will be able to choose records to associate the email activity to in the Messages module. For email addresses that do not match any records, the user may choose to create a Lead, Account, or Contact within the Messages module and automatically associate the email activity.
Required for Setup:
Create a new email address using your desired email provider or platform that will be dedicated to receiving emails for the archiving service. This email should not be in current use for reading mail, as mail that has been accessed and read will not be picked up by the archiving service.
Once you have created your email address:
- Enable IMAP protocol for the email address.
-
Find incoming mail setting conditions– these are usually found in the settings section of your email account.
- Incoming Server Name
- Incoming Server Port
- Does the server require SMTP authentication?
- Username and Password for the archiving email
- Mail protocol
- Preferred SSL option
Note: The email address configured should be dedicated to receiving emails for the Email Archiving Service. Users should not provide this email for subscriptions to mass email lists.
To configure the email archiving service as an administrator, please log into the administrator account and visit the ‘Admin Settings’. Scroll to the bottom of the Admin Settings and select the ‘Email Archiving Service Setup’ module from the ‘Other Settings’ section.
Once the administrator has accessed the ‘Email Archiving Service Setup’ enter the configuration details as specified by your email platform provider (required information above). If you believe that the default options for configuration have been changed by your IT department, contact your IT department for correct configuration information.
Select save.

Configuration for Gmail Accounts – Default
Once saved, users with recognized email addresses (same AMPED username as email) will be able to include the configured email archive address in their communications to create email activity records associated with Lead, Account, or Contact records within the application.
Notes:
- For certain email providers administrators might need to accept log in activity from AMPED in the security settings section of the application. If access to the email account is not granted, the administrative user will receive an error message upon saving the configuration. Ex. Administrators configuring Gmail accounts for the Email Archiving Service should access Account > Security > Recent Activity and accept login from “Application/device sign-in”. Then enter the configurations above into AMPED and select ‘Save’.
- All emails received to the archiving service must be from an email matching your username in order to be associated.
- Emails that include the archiving address in the Bcc address section will need to have the archiving address re-added on future communications for continuous conversation documentation.
- Forwarding or sending an email chain to the archiving service without any additional recipients will currently produce no email activity record association within AMPED or the Messages module. This functionality is currently being worked on and will be released shortly.
- There is up to a 10-minute time lapse between sending and record association, and record appearance in the Messages module.
For additional standard use information on this feature, please visit the Video Tutorial Suite, available from the Help & Support page within your Vantage CRM account. Once in the Tutorial Suite, select ‘Cool Features’ and ‘Email Archiving Service’ to learn more.
The Workflow module in AMPED provides a simple interface to add actions upon ‘Save’ of a record. These actions are automatically triggered when given conditions are met. The Workflow module provides a number of options to trigger actions based on conditions on ‘Save’ of records, date matches, or filter matches. To access the Workflow module, go to the Admin Settings page, scroll to the Other Settings section, and select Workflow.
Types of Workflow triggers include:
- Only on the first save: The application searches for the conditions at the time of record creation and executes the workflow if the conditions are met. The workflow will not be executed if the conditions do not match.
- Until the first time the condition is true: The application searches for the conditions and executes the workflow once it finds the conditions to be true. Afterward, the workflow is no longer valid.
- The first time the condition is true: The application looks for the conditions and when the condition is true it will execute the workflow. After this change, the workflow will remain valid. If the record is updated to conditions that do not satisfy the rule and then back again to satisfying conditions, the workflow rule will execute.
- Every time the record is saved: The application checks for the conditions each time the record is saved and executes and triggers the workflow if the conditions match.
- Every time a date is matched: At a specified time before or after a given date, the application will trigger a workflow. Dates can be matched by day, by day and month, or by the exact date.
- On a specified day of a week: The application triggers a workflow on a specific weekday when a certain filter condition is met.
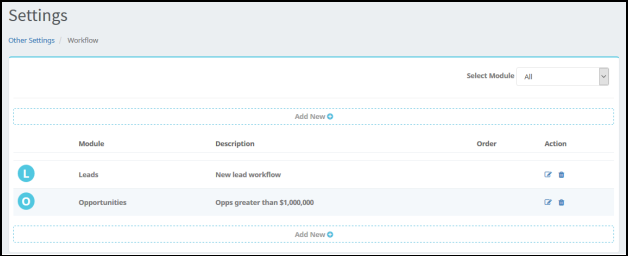
Viewing ‘All’ Workflow Rules – List View
From the Workflow module, users can ‘Add New’, ‘Edit’
![]() and ‘Delete’
and ‘Delete’
![]() Workflow rules.
Workflow rules.
Creating a Workflow rule:
To create a new workflow rule select ‘Add New’ from the top or bottom of the list. A pop-up will appear listing the available modules.
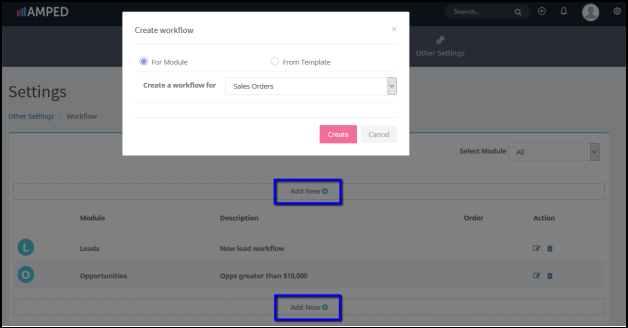
Adding a New Workflow
Select a module and click ‘Create’. You will be taken to an edit page for the workflow.
Add a description for the workflow. You can specify here when workflow should run.
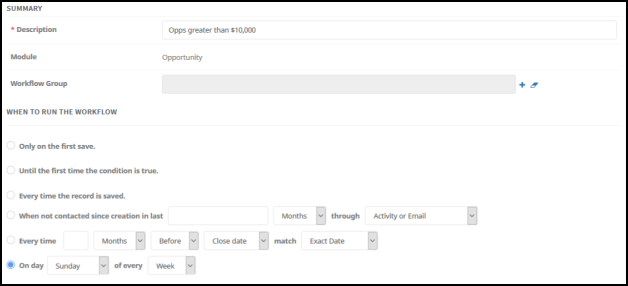
Creating a New Workflow – Summary, Description and Timing
You can add one or more conditions by clicking the ‘Add New’ in the ‘Conditions’ section.

Setting Workflow Conditions
Click ‘Save’ to save the new workflow.
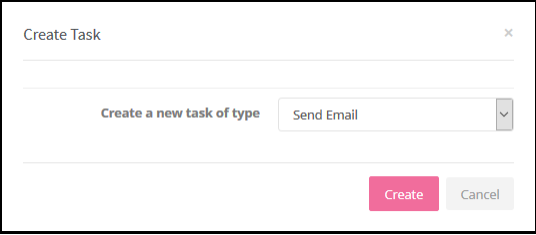
Once you have saved the workflow, you will be presented with a screen where you can add one or more tasks for the workflow. The task(s) will be executed once the workflow conditions are satisfied.
Create Tasks:
Click ‘Add New’ in the ‘Task’ section to add a new task. You will get a pop-up to select the type of task you can create. Currently, there are three types of tasks you can automate:
- Send Email – Use to send an email to specified recipients when the conditions are met.
- Create Activity – Use to create a new Activity when the conditions are met.
- Update Field – Use to update a field with a given value when the conditions are met.
Select a task type from the dropdown and click on the ‘Create’ button to create the task.
Creating a New Task in a Workflow
Configuring a Workflow Task:
Email Task
There is a description field in the email task edit page. The workflow status field specifies whether the task is active; if the task is marked ‘Inactive’, it will not be executed when the workflow evaluates to true. The admin user can specify when the task is executed relative to the time in a date field. There are also merge fields related to the Workflow module in a dropdown that can be used in an email template created through the rule.
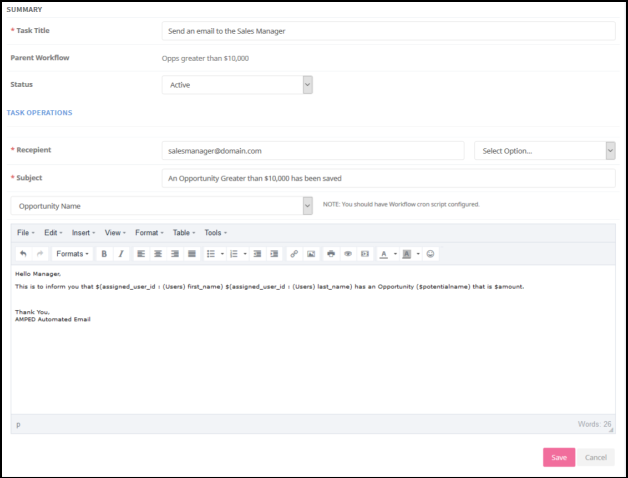
Creating a Workflow Task – Email
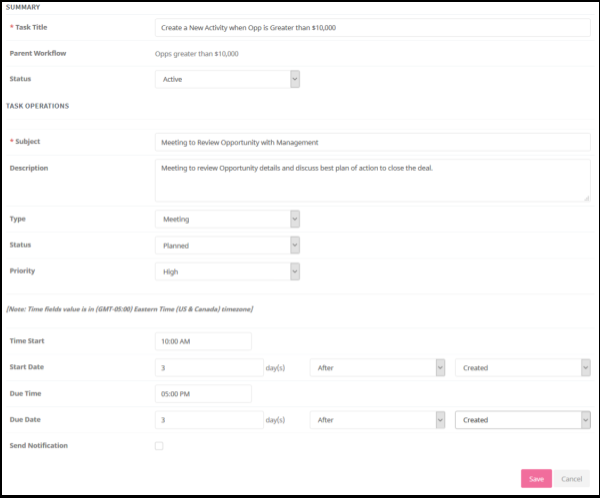
Activity Task:
Using this option, a workflow rule can create a new Calendar Activity when a condition is matched. The following fields are provided in the create view of the Activity task:
- Subject
- Description
- Type
- Status
- Priority
- Start Time
- Start Date
- Due Time
- Due Date
- Send Notification
Creating a Workflow Task – Activity
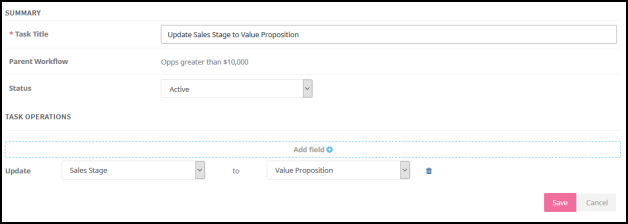
Update Field Task:
Enter a description for the task title and click ‘Add Field’. Choose which field to update from the dropdown and select updated value. For picklists, the option for update will be present in a dropdown. For fields that are text, number, or other values, the update is entered manually.
Creating a Workflow Task – Update Field
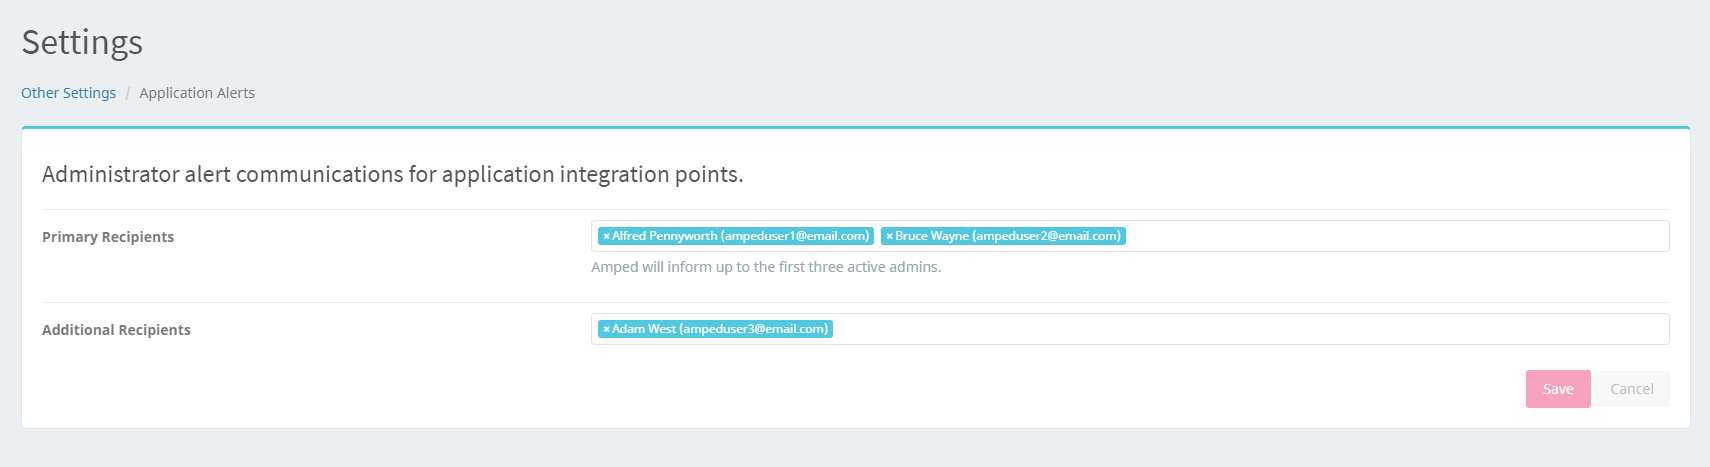
Application Alerts:
The Application Alerts is used to decide who receives the administrator alert communications for application integration points. These Notifications can include various error messages such as support inboxes failing to connect.
There are two sections in this module: Primary Recipients and Additional Recipients. Amped will inform up to the first three active admins in the Primary Recipients section, but the recipients can be modified.
In the Additional Recipients section, you can add other admins or email addresses to receive the same notification.

Records can be imported to AMPED from a Comma Delimited (CSV) file. CSV files can be created by saving an excel file as a: “CSV (comma delimited) (*.CSV)”. To save your file as a CSV, select “Save As” and change file type to CSV.
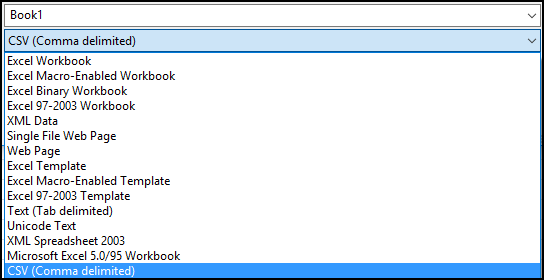
Saving File as CSV
Files may be imported to any module that displays the Import/Export buttons in the top right menu dropdown. To import records to a module, first select the desired module from the left menu to be directed to the list view page. Next, select the Import button from the module menu in the top right corner of the page.
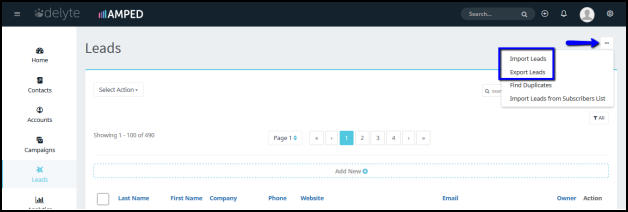
Selecting Import or Export of Records
Importing New Records
For new record imports, the user importing must verify that all fields with values to be added are present as columns in the import file. The module templates provided display all standard fields within the Leads, Accounts, and Contacts modules.
Check your file for:
Ownership of Records - Check that the records to be imported are assigned to the right user. Add a column that includes the username of the owner of the records. Although the application displays the Owner as First Name Last Name (ex. John Smith) in user interface, username (ex. jsmith@companyabc.com) is the most unique identifier for assigned to.
Notes:
- Each record in a file can be owned by a different user.
- When the “Owner” column is not included in the import file, the records will be assigned to the user who is importing the records.

Username as the Owner of the Imported Records
Mandatory Fields - Check that your file includes columns that correspond to the mandatory fields of the module that you are importing. Users with administrative privileges can check the mandatory fields for a specific module by going to the Admin Settings, and locating the Mandatory Fields module within the Studio block. Fields marked with a check are mandatory to be included in your file for a record to be created and saved into the module.
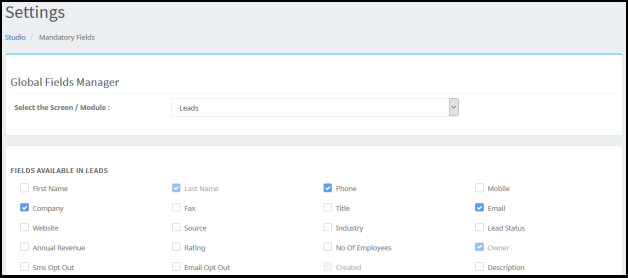
Checking Mandatory Fields in the Admin Settings
Field Format - The information being imported into a particular field must match the format of the field. For example, if the field being imported into is a numeric field, then the values for that column in the import must also be numeric. More information on field format can be found in the section on Custom Fields on field types.
Picklist Values - If any of the information you are importing belongs in a picklist, check that the values that you are importing match exactly the values in the picklist. Users with admin privileges can check and change picklist fields by going to the Admin Settings, and then going to the Picklist Editor module within the studio block.
Check that the picklist values that you are importing do not include empty spaces at the end of the excel field value. For standard users performing imports, if values for import are not identical to a value in the picklist the file will not be imported. An error report will be generated after failed import to detail the problem. For administrative users performing the import, if values for import are not identical to a value in the picklist all “new” values will be imported and added as new picklist values.*
*Note: If the Administrator performing the import does not verify exact field values, the application intelligently recognizes that you are a high level user and will add any newly recognized values to the represented picklists.
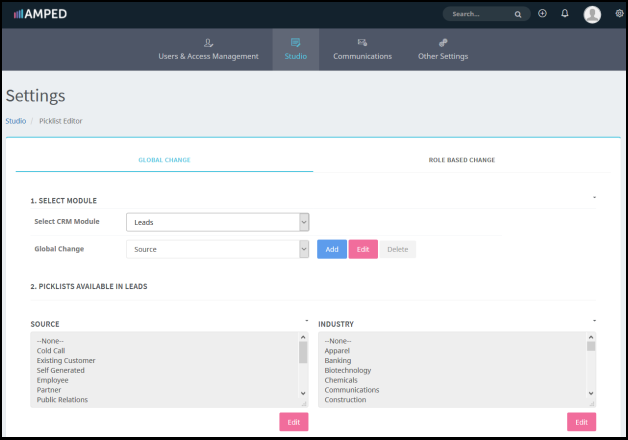
Picklist Editor – Checking Available Picklist Values
Website Address - When importing website addresses, eliminate “https://”. The application automatically adds this prefix to any web address. Users can remove the prefix this by selecting the website column in the csv-excel file. Then use the function Find and replace (CTRL+F), select the replace tab. Enter http:// into the find field, and leave the replace field blank. Select “Replace All” to eliminate the https:// prefix.

Removing “https://” from the Import File
Checklist Summary:
- Check that all the columns included in your Excel file exist as a field in AMPED.
-
Check for duplicate records – this can be done manually through Excel or through Step 2 of the Import process (detailed below).
-
Check that the records you are importing are following any naming convention that has been previously determined by the administrator for site organization.
-
Check that the records are assigned (have an Owner). If not, they will be automatically assigned to the importing user.
-
Check that the file has all mandatory fields for record creation.
-
Check that all field values are in the correct field format.
- Check that the field values to be imported to a picklist field match the current values within the picklist.
Importing Accounts and Contacts
The difference between Leads and Accounts and Contacts is that the Lead records include the company information and the person associated to the company. Account records and Contact records are two different entities linked to each other by the Account (company) name. The Account includes the information regarding the company (revenue, employees, industry, etc.) and the Contact includes information of the person associated to the company. One Account can have multiple Contacts associated to it.
To import Accounts and Contacts, you need two files:
File 1 - Accounts:
This file should include the fields relative to the company (Account Name, Revenue, Employees, Industry, Account Phone Number, Address of the Account, etc.).
*Note:
The Account file should include one line (record) per company. Account records should be de-duplicated before import.
File 2 -
Contacts:
This file should include the fields related to the person(s) associated to the Account (First Name, Last Name, Account Name, Email Address, Phone Number of the Contact, etc.). The contact file can include multiple Contacts per company.
*Note:
Since the company name is the field used to link the Accounts and Contacts, be sure that Account Name is an exact match in the Contact and Account records, so that the Contacts can be attached to the correct Account.
*Note: Import Accounts before Contacts. This ensures that there is an Account for the Contact to belong to and will correctly relate records through import. If for any reason, the Accounts are not imported prior to the Contacts; Accounts will be created on the fly using the company name of the Contact. The Accounts created during the import process will include only the company name and no other information.
- Go to the module where you would like to import the records select Import from the Module Menu dropdown:
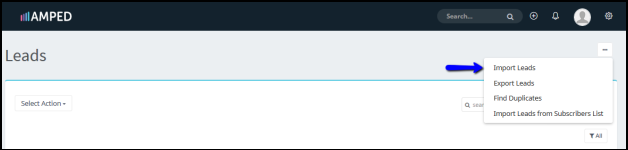
Select “Import Leads” from the Module Menu Dropdown
- To start the import process, drop the .CSV file or browse to locate it. Click on the Next button to continue:
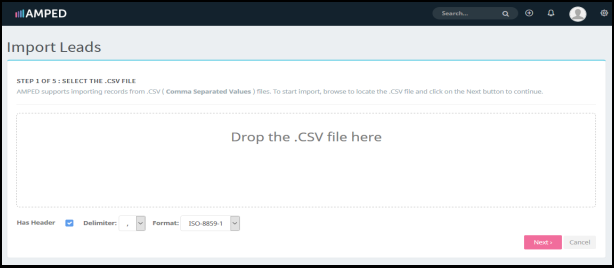
Drop Files to Start Import – Or Click to Browse Files
- Map the fields of your .CSV file with the fields of AMPED and click “Next”:
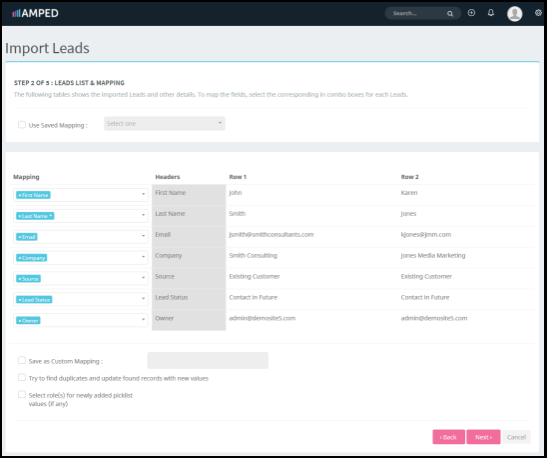
Mapping Fields for Import
After completing the field mapping there are several checkbox options to make the import process easier (See options at the bottom of Image above):
- Mapping can be named and save if the user is doing many imports of the same type. After saving the custom mapping, the user will not have to map the fields over before each future import. To use a pre-saved custom mapping, you should use, on your excel file, the same headers used for the excel field when mapping was saved.
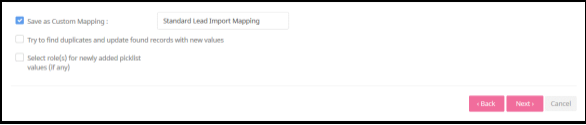
Saving Custom Mapping for Imports
- Duplicates of records which are already present in the application are also able to be detected through the import process. Check the duplicates box and click Next. A new screen will display in which the user selects fields to match upon importing. This feature looks for duplicates in the system and the file being imported matching the fields selected. Duplicate records are not imported.

Select which Fields to Check for Duplicates
- Picklist values can also be added upon import for specific roles by selecting the last checkbox.
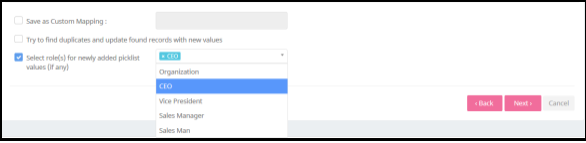
Choose which Roles to Add New Picklist Values to
After mapping the fields and selecting additional import options, click “Next”. AMPED will check that all the records have the required format to be imported. On the last stage of the import process, a message will display informing you how many records were imported successfully, updated, or skipped due to validation errors. Click “Finish”, “Cancel”, or “Import More”.
If AMPED informs you that all the records were successfully imported, you can click finish. If it informs you that there were some records skipped due to missing information or format problems, you can choose “cancel” to undo the whole import, or “Finish” just to import only the validated files. Select “Download Erroneous Records” to view records with errors for importing. The error reason is available in the last column of the file. Check and correct the CSV file, and start the import process again.
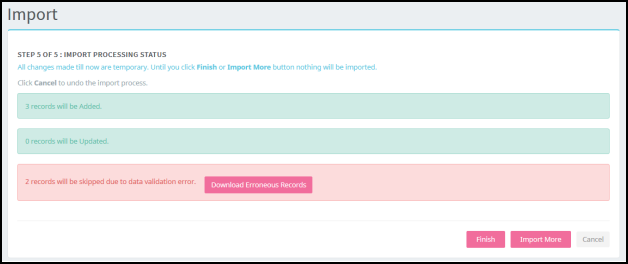
Download Erroneous Records, Finish Import, Import More Records, or Cancel the Import
Users with admin capabilities can update a group of records by exporting them from AMPED and importing them back into the application:
For updating pre-existing records you need to include in your file:
- Record ID (This column is included when you export your records from AMPED).
- Mandatory fields (depending on the module that you are importing).
- The columns receiving the update.
*Note: During the re-importing process of Contacts, the Contacts are attached again to the corresponding Accounts. In the event that there are duplicated Accounts, the Contact will be attached to the Account that was created first.