
Import Guide
Records must be imported to AMPED from a Comma Delimited (CSV) file. CSV files can be created by saving an excel file as a: “CSV (comma delimited) (*.CSV)”. To save your file as a CSV, select “Save As” and change file type to CSV.
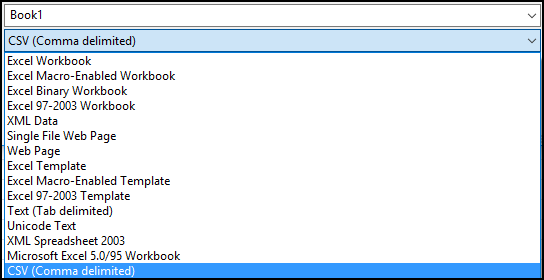
Saving File as CSV
Files may be imported to any module that displays the Import/Export buttons in the top right menu dropdown. To import records to a module, first select the desired module from the left menu to be directed to the list view page. Next, select the Import button from the module menu in the top right corner of the page.

Selecting Import or Export of Records
Importing New Records
For new record imports, the user importing must verify that all fields with values to be added are present as columns in the import file. The module templates provided display all standard fields within the Leads, Accounts, and Contacts modules.
Check your file for:
Ownership of Records - Check that the records to be imported are assigned to the right user. Add a column that includes the username of the owner of the records. Although the application displays the Owner as First Name Last Name (ex. John Smith) in user interface, username (ex. jsmith@companyabc.com) is the most unique identifier for assigned to.
Notes:
- Each record in a file can be owned by a different user.
- When the “Owner” column is not included in the import file, the records will be assigned to the user who is importing the records.

Username as the Owner of the Imported Records
Mandatory Fields - Check that your file includes columns that correspond to the mandatory fields of the module that you are importing. Users with administrative privileges can check the mandatory fields for a specific module by going to the Admin Settings, and locating the Mandatory Fields module within the Studio block. Fields marked with a check are mandatory to be included in your file for a record to be created and saved into the module.
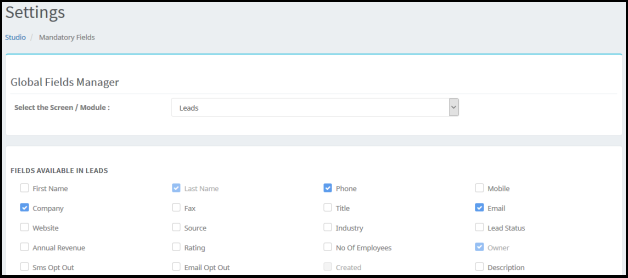
Checking Mandatory Fields in the Admin Settings
Field Format - The information being imported into a particular field must match the format of the field. For example, if the field being imported into is a numeric field, then the values for that column in the import must also be numeric. More information on field format can be found in the section on Custom Fields on field types.
Intelligent Import Field Mapping – Mapping can be automated based on field names and data types. As an example, "First name" will be matched with any of the following fields from the import file: fname, f_name, First_name, forename, given name, etc.
Picklist Values - If any of the information you are importing belongs in a picklist, check that the values that you are importing match exactly the values in the picklist. Users with admin privileges can check and change picklist fields by going to the Admin Settings, and then going to the Picklist Editor module within the studio block.
Check that the picklist values that you are importing do not include empty spaces at the end of the excel field value. For standard users performing imports, if values for import are not identical to a value in the picklist the file will not be imported. An error report will be generated after failed import to detail the problem. For administrative users performing the import, if values for import are not identical to a value in the picklist all “new” values will be imported and added as new picklist values.*
*Note: If the Administrator performing the import does not verify exact field values, the application intelligently recognizes that you are a high level user and will add any newly recognized values to the represented picklists.
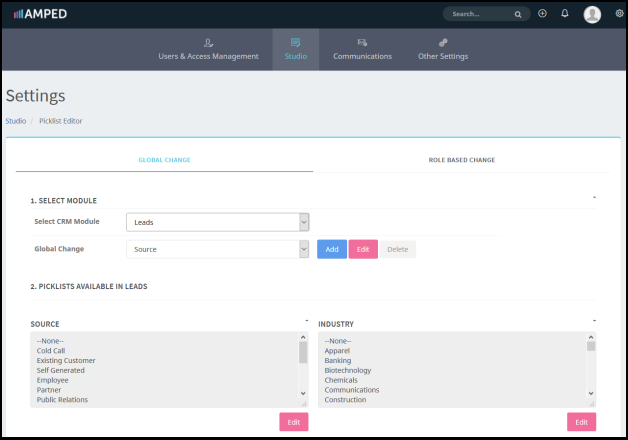
Picklist Editor – Checking Available Picklist Values
Checklist Summary:
- Check that all the columns included in your Excel file exist as a field in AMPED.
-
Check for duplicate records – this can be done manually through Excel or through Step 2 of the Import process (detailed below).
-
Check that the records you are importing are following any naming convention that has been previously determined by the administrator for site organization.
-
Check that the records are assigned (have an Owner). If not, they will be automatically assigned to the importing user.
-
Check that the file has all mandatory fields for record creation.
-
Check that all field values are in the correct field format.
- Check that the field values to be imported to a picklist field match the current values within the picklist.
Importing Accounts and Contacts
The difference between Leads and Accounts and Contacts is that the Lead records include the company information and the person associated to the company. Account records and Contact records are two different entities linked to each other by the Account (company) name. The Account includes the information regarding the company (revenue, employees, industry, etc.) and the Contact includes information of the person associated to the company. One Account can have multiple Contacts associated to it.
To import Accounts and Contacts, you need two files:
File 1 - Accounts:
This file should include the fields relative to the company (Account Name, Revenue, Employees, Industry, Account Phone Number, Address of the Account, etc.).
*Note:
The Account file should include one line (record) per company. Account records should be de-duplicated before import.
File 2 -
Contacts:
This file should include the fields related to the person(s) associated to the Account (First Name, Last Name, Account Name, Email Address, Phone Number of the Contact, etc.). The contact file can include multiple Contacts per company.
*Note:
Since the company name is the field used to link the Accounts and Contacts, be sure that Account Name is an exact match in the Contact and Account records, so that the Contacts can be attached to the correct Account.
*Note: Import Accounts before Contacts. This ensures that there is an Account for the Contact to belong to and will correctly relate records through import. If for any reason, the Accounts are not imported prior to the Contacts; Accounts will be created on the fly using the company name of the Contact. The Accounts created during the import process will include only the company name and no other information.
The Import Process
- Go to the module where you would like to import the records select Import from the Module Menu dropdown:
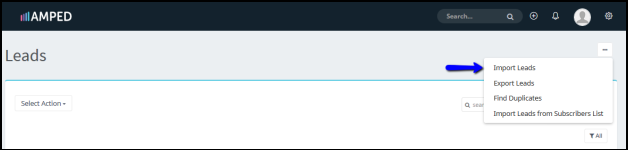
Select “Import Leads” from the Module Menu Dropdown
- To start the import process, drop the .CSV file or browse to locate it. Click on the Next button to continue:

Drop Files to Start Import – Or Click to Browse Files
- Map the fields of your .CSV file with the fields of AMPED and click “Next”:

Mapping Fields for Import
After completing the field mapping there are several checkbox options to make the import process easier (See options at the bottom of Image above):
- Mapping can be named and save if the user is doing many imports of the same type. After saving the custom mapping, the user will not have to map the fields over before each future import. To use a pre-saved custom mapping, you should use, on your excel file, the same headers used for the excel field when mapping was saved.
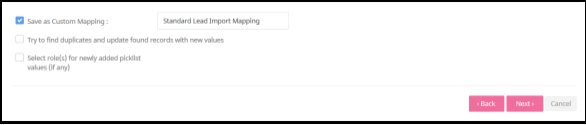
Saving Custom Mapping for Imports
- Duplicates of records which are already present in the application are also able to be detected through the import process. Check the duplicates box and click Next. A new screen will display in which the user selects fields to match upon importing. This feature looks for duplicates in the system and the file being imported matching the fields selected. Duplicate records are not imported.
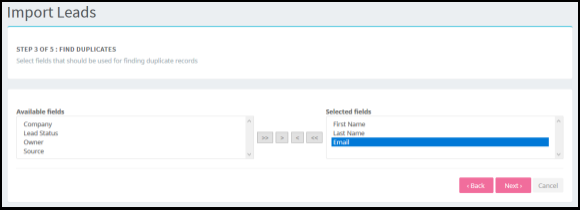
Select which Fields to Check for Duplicates
- Picklist values can also be added upon import for specific roles by selecting the last checkbox.

Choose which Roles to Add New Picklist Values to
After mapping the fields and selecting additional import options, click “Next”. AMPED will check that all the records have the required format to be imported. On the last stage of the import process, a message will display informing you how many records were imported successfully, updated, or skipped due to validation errors. Click “Finish”, “Cancel”, or “Import More”.
If AMPED informs you that all the records were successfully imported, you can click finish. If it informs you that there were some records skipped due to missing information or format problems, you can choose “cancel” to undo the whole import, or “Finish” just to import only the validated files. Select “Download Erroneous Records” to view records with errors for importing. The error reason is available in the last column of the file. Check and correct the CSV file, and start the import process again.

Download Erroneous Records, Finish Import, Import More Records, or Cancel the Import
Updating Existing Records
Users with admin capabilities can update a group of records by exporting them from AMPED and importing them back into the application:
For updating pre-existing records you need to include in your file:
- Record ID (This column is included when you export your records from AMPED).
- Mandatory fields (depending on the module that you are importing).
- The columns receiving the update.
*Note: During the re-importing process of Contacts, the Contacts are attached again to the corresponding Accounts. In the event that there are duplicated Accounts, the Contact will be attached to the Account that was created first.